The intended purpose of the documentation is to explain the main features of TextMate and to highlight features that may not be obvious to first time users. The documentation is not exhaustive.
You should have a good understanding of what a text editor is, in particular you should have some experience with Cocoa’s text edit control (used in TextEdit, Mail and Xcode). While TextMate does not use that control, it does mimic its behavior for the most part.
If you want to print this documentation then here is a printable version.
From UNIX we get that Tasks and Trends Change. In concrete terms this means that instead of writing a command (in UNIX) to solve the problem at hand, we find the underlying pattern, write a command to solve problems of that type and then use that command in a script.
This gives us a command which we can re-use in the future for multiple problems of the same type. Since it is generally much easier (and more flexible) to piece together a script of different commands than it is to write a specific command the increase in productivity can be very large. This is especially true since we do not actually write the command in the first place, we use an existing command that has already been written for this type of problem.
There are two ways in which TextMate leverages that philosophy. First it has good shell integration, so if you are skilled in using the UNIX shell, you should love TextMate.
But more ambitiously, TextMate tries to find the underlying patterns behind automating the tedious, being smart about what to do and then to provide you with the functionality so that you can combine it for your particular needs.
Granted, TextMate is not the first text editor which tries to be broad, but from Apple we get the venerable Keep It Simple. So even users with little or no experience with scripting and regular expressions are able to customize TextMate in ways that no other editor would have allowed them to.
Having said that, the philosophy of TextMate is also to Educate the User. So to fully capitalize on what TextMate gives you, you should learn about regular expressions, you should understand TextMate’s scope, snippet system (also language grammars to some degree) and have an idea about the shell infrastructure provided (in particular environment variables, pipes and stdin/stdout).
For the most part TextMate and this documentation abides by Apples terminology. Below is a table of terms that might be a source of misunderstanding.
| Term | Explanation |
|---|---|
Caret |
The text insertion point. |
Cursor |
Mouse pointer. |
Document |
This refers to a file when it is loaded into TextMate (for the purpose of being edited). Old-timers often refer to this as the buffer. |
Directory |
This is sometimes used instead of folder. Folder is mainly used when talking about the GUI and directory is used when talking about shell related things. |
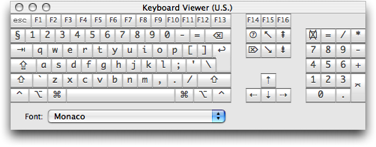
Generally TextMate and this documentation use the glyph representation of a key. Below is a table with most glyphs, the name of the key (as used in this documentation) and a short explanation.
If you are unsure about the location of a key, you can bring up the Keyboard Viewer, which you can add to the Input menu in the International pane of System Preferences.
| Glyph | Key Name | Explanation |
|---|---|---|
⌃ |
Control |
This key is generally in the lower left corner of the keyboard (and symmetrically placed on the right side). In addition to key equivalents, this key is also used with a mouse click to bring up context sensitive menus. |
⌥ |
Option |
This is next to the control key and often bears the label Alt. You can hold down the option key while dragging with the mouse to select text rectangularly. It is also possible to place the caret beyond the end of a line by single-clicking the mouse while holding the down option key (⌥). Together with Shift, the option key does a (rectangular) selection to where you click. |
⌘ |
Command |
The command key is also referred to as the Apple key since it has an apple symbol on it (). |
⇧ |
Shift |
The Shift key should be well-known. When used together with a mouse click, it extends the selection. |
⎋ |
Escape |
The escape key is generally in the upper left corner of the keyboard. This key can be used to dismiss (cancel) panels, which means dialogs and some (but not all) windows. In TextMate it is also used to cycle through completion candidates. |
⌅ |
Enter |
The enter key is on the numeric keypad (and is not the same as return). On laptops it is fn-return. |
↩ |
Return |
The return key should be well known. |
⌦ |
Forward Delete |
This is often just called delete and on the keyboard has a label of Del or Delete. |
⌫ |
Backward Delete |
Often called backspace. On most keyboards this has a left pointing arrow on the key (←). |
﹖⃝ |
Help |
The Help key is located above Forward Delete, but not all keyboards have it. Generally it has the word Help on the key, but it is also known as the Ins key. |
↖ |
Home |
The Home key scrolls to the beginning of the document, but does not move the caret. |
↘ |
End |
The End key scrolls to the end of the document, but does not move the caret. |
⇞ |
Page Up |
Scrolls up a page without moving the caret. Using the option key will cause the caret to be moved. When used with Shift it will create a selection. |
⇟ |
Page Down |
Scrolls down a page without moving the caret. Using the option key will cause the caret to be moved. When used with Shift it will create a selection. |
⇥ |
Tab |
The Tab key is used to insert a tab character (or equivalent amount of spaces if soft tabs are enabled). In normal controls it advances the focus to the next control. |
⇤ |
Back-tab |
The Back-tab key can be used by holding down Shift while pressing the normal Tab key. |
TextMate is a work-in-progress. One current key limitation (for non-Western users) is support for international input modes (e.g. CJK), proportional fonts, right-to-left text rendering and other (UniCode) features. As the author, I do understand the desire from users to have TextMate support these things, but currently proper support for this is a long-term to-do item.
And on the topic of limitations, I am also aware of the desire for (s)ftp integration, code hinting, split views, better printing, indented soft wrap, coffee making and literally hundreds of other user requests. You will be able to find my comments on most feature requests by searching the mailing list archive, but I do not give estimates or timeframes, other than what version number I plan for something to appear in.
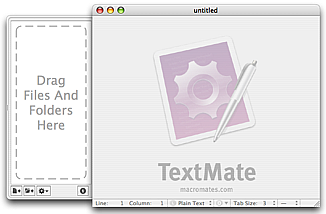
In the current version of TextMate (1.5) file tabs are only supported when a project is created. Fortunately it is easy to create a project, namely by selecting File → New Project (⌃⌘N).
This opens a window which looks like the one below.
It is possible to add files either by dragging them to the (project) drawer, or use the “Add Existing Files…” action in the project drawers action menu (the one with the gear icon).
Another way to create a project is by dragging files directly onto the TextMate application icon (shown e.g. in the dock). This is a shortcut for creating a new project consisting of these files.
One minor detail is that when creating a project this way, you will not be asked if you want to save the project, when it is closed.
The advantage of saving a project is to maintain state (e.g. which files were open) and to be able to quickly re-open a particular set of files. If you leave a (saved) project open when you quit TextMate, it will automatically re-open that project the next time you launch TextMate.
It is also possible to create projects from the terminal e.g. using the mate shell command.
When you want to have your project mimic the files and folders on disk, you can drag a folder either onto the TextMate application icon, or into the project drawer.
TextMate will then create a folder reference where it automatically updates the contents of the folder when it changes on disk.
Currently updating is done when TextMate regains focus and can be slow for some network mounted disks, in which case you may want to settle for only adding individual files to the project (which can be grouped and re-ordered manually to mimic the structure on disk).
The refresh delay for network mounted disks will be addressed in a future release.
When using folder references, you may want to have certain files or folders excluded from the project. This can be done by changing the file and folder patterns found in Preferences → Advanced → Folder References.
These are regular expressions which are matched against the full path of each file and folder. If the pattern does match the item, it is included, otherwise it is excluded. To reverse that, so that items which match are excluded from the project, prefix the pattern with an exclamation point (!).
The patterns are only used when creating new folder references. For existing folder references one can select the folder reference in the project drawer and use the info button (a circled letter I) in the project drawer to edit the patterns.
The complexity of this system will be addressed in a future release.
You can either single or double click files in the project drawer. If you single click them and the file type is text, they open as a file tab in the main window.
![]()
If you double click a file, it will open using the default application. Note that folders can also be double clicked e.g. Interface Builder’s nib files will appear as folders, but can still be double clicked (and will then open in Interface Builder).
As mentioned, only text files will open in the main window when single clicked. The way TextMate determines if a file is text is by its extension - if the extension is unknown it scans the first 8 KB of the file to see if it is valid UTF-8 (which is a superset of ASCII).
If TextMate does not open your file and it does have an extension you can bring up the action menu for that file and pick the last item, which should read: Treat Files With “.«ext»” Extension as Text.
The project drawer will by default open on the left side of the project window. If there is no room for it to open there, it will use the right side instead. This setting is sticky so will remember which side the project drawer was last opened on.
To move it back to the left side you need to close the drawer (View → Hide Project Drawer) and then move the project window so that there is no longer room for the drawer on its right. When you then re-open the drawer, it will again appear on the left side and use that as the new default.
The opposite can be done to force it to open on the right side.
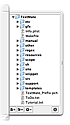
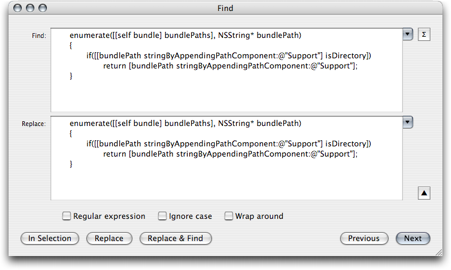
Using Edit → Find → Find in Project… (⇧⌘F) will bring up the window shown below.
From here it is possible to search all (text) files in the current project and do replacements. After pressing Find it is possible to either press Replace All, or select which matches should be replaced, in which case the Replace All button will change to Replace Selected.
Currently it is not possible to limit the scope of the search to anything other than all text files in the full project. As a workaround, when you want to search only a subset of your project, you can select the files you want to search in the project drawer and drag the selection to the TextMate application icon to create a new scratch project. A find/replace can then be performed on that project, which can then be closed.
When working with projects there are a few ways to move between the open files.
The most straightforward way is by clicking on the file tab you need. This can also be done from the keyboard by pressing ⌘1-9, which will switch to file tab 1-9.
You can also use ⌥⌘← and ⌥⌘→ to select the file tab to the left or right of the current one.
It is possible to re-arrange the file tabs by using the mouse to drag-sort them (click and hold the mouse button on a tab and then drag it to the new location). This should make it possible to arrange them so that keyboard switching is more natural.
One more key is ⌥⌘↑ which cycles through text files with the same base name as the current file. This is mainly useful when working with languages which have an interface file (header) and implementation file (source).
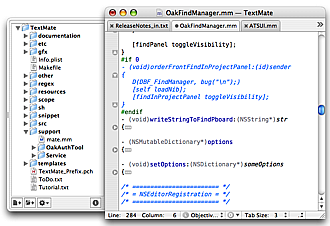
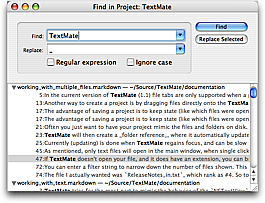
When you want to move to a file which is not open you can use the Go to File… action in the Navigation menu (bound to ⌘T). This opens a window like the one shown below.
This window lists all text files in the project sorted by last use, which means pressing return will open (or go to) the last file you worked on. So using it this way makes for easy switching to the most recently used file.
You can enter a filter string to narrow down the number of files shown. This filter string is matched against the filenames as an abbreviation and the files are sorted according to how well they match the given abbreviation. For example in the picture above the filter string is otv and TextMate determines that OakTextView.h is the best match for that (by placing it at the top).
The file I want is OakTextView.mm which ranks as #2. But since I have already corrected it in the past, TextMate has learned that this is the match that should go together with the otv filter string, i.e. it is adaptive and learns from your usage patterns.
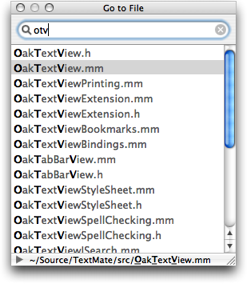
If you need to move the caret to somewhere else in your document and want a quick way to return, you can place a bookmark on the current line.
This is done either by clicking in the gutter (in the column dedicated to bookmarks) or pressing ⌘F2. The bookmark will be indicated with a star as shown below.
When you want to return you can press F2, which moves you to the next bookmark in the document. If there is more than one bookmark, you can press F2 repeatedly. ⇧F2 will move to previous bookmark.
When working in a language which has start/end markers for blocks, like { … }, do … end, <tag> … </tag> and similar, TextMate can spot these blocks and will show up/down arrows in the gutter beside the start/end marker.
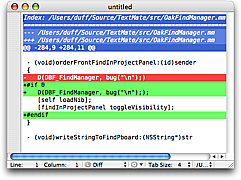
When these arrows are present, it is possible to fold the block into a single line either by using the mouse and clicking on the up/down arrow, or pressing the F1 key. This will make the arrow in the gutter point to the right and indicate that the entire block was folded by placing an ellipsis marker at the end of the line. An example where the two sub-blocks of the constructor has been folded can be seen below.
With text folded, it is possible to unfold it with F1 or clicking either the arrow in the gutter or the ellipsis image. It is also possible to hover the mouse pointer on the ellipsis image to get a tool tip which shows the contents of the folded block. The latter is shown on the following picture.
A word of caution: the folding system is based on both having clear indent markers and having the fold start/stop markers use the same indent level. This means that folding based purely on indent or where the start/stop markers do not align, is currently not supported.
As mentioned the folding system uses explicitly defined start and stop markers. TextMate knows about these from the language grammar where you can setup a foldingStartMarker and foldingStopMarker regular expression.

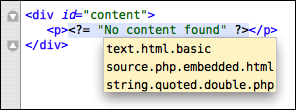
Shown above are the HTML folding patterns, which are all relatively simple because they fold on a selected set of tag pairs, HTML comments, some Smarty tags and start/stop braces when either last on the line or used in embedded code tags like this:
<?php if(something) { // user is authenticated ?>

   ...

<?php } // user is authenticated ?>
To define a block that starts with { as the last non-space character on the line and stops with } as the first non-space character on the line, we can use the following patterns:
foldingStartMarker = '\{\s*$';
foldingStopMarker = '^\s*\}';
For languages that support it, the rightmost pop-up in the status bar shows the current “symbol” (often the function prototype or heading above the caret).
![]()
It is possible to click on the pop-up to get a list of all the symbols in the current document and move the caret to one of these. This is shown below.
For keyboard navigation there is also Navigation → Go to Symbol… (⇧⌘T) which opens a panel like the one shown below. The contents of this pane are the same as the pop-up from the status bar but this panel supports filtering similar to the Go to File… panel (i.e. where the filter string is treated as an abbreviation and matches are ranked according to how good a fit the abbreviation seems to be).
The panel can be left open and will automatically update as the document is edited. If you single-click an item in the list, the caret will move to the symbol clicked. Double-clicking will do the same but also closes the panel.
The symbol list works using language grammars and scope selectors. A language grammar assigns names to each element in the document and a scope selector is capable of targeting a subset of the document based on these names. Normally the parallel is HTML and CSS, e.g. we can make a theme item which sets the background to blue and then use the scope selector to pick which elements in our document we want this theme (and hence the blue background) applied to.
Bundle preferences work like theme items, except that instead of changing visual settings they (generally) change non-visual settings. One exception is the showInSymbolList. By setting this to 1 and using a scope selector which (for example) targets all function names, we are using that scope selector as a query to extract all the function names from the document, for use in the symbol list.
So to populate the symbol list we need to:
Make sure the language grammar assigns a name to what we want to show.
Create a bundle preferences item that sets showInSymbolList to 1 and uses a scope selector that matches the symbols we want to have in the symbol list.
In addition to the showInSymbolList setting there is a symbolTransformation setting which is one or more regular expression substitutions which are performed on the text extracted. The value of this setting should be: s/«regexp»/«format»/«options» optionally followed by ; and more substitutions. It is also possible to put comments in the value, these start with # and end at the next newline.
So if we want to show Markdown headings in the list, which are lines that start with one or more # marks, then we first make sure our language grammar assigns a name to these, for Markdown that can be identified with this rule, by specifying the following in the language grammar:
{  name = 'markup.heading.markdown';
   match = '^#{1,9}\s*(.*)$';
},
Now we can target all headings using a scope selector of markup.heading.markdown. We can now create a bundle preferences item that is simply:
{ showInSymbolList = 1; }
This will include the leading # marks in the list, which is undesirable. We can either assign a name (via the language grammar) to the actual title, or we can perform a regular expression substitution to get rid of the leading # marks. The latter has the advantage that we can change these to indent, so that is what we do, by changing the preferences item to:
{  showInSymbolList = 1;
   symbolTransformation = '
      s/(?<=#)#/ /g;          # change all but first # to m-space
      s/^#( *)\s+(.*)/$1$2/;  # strip first # and space before title
   ';
}
TextMate tries for the most part to mimic the behavior of the NSTextView system component, as used by applications such as Mail, Safari and basically all other Cocoa applications.
Some of the extra features related to text editing are covered in this section.
When writing structured text (like markup or source code) there are characters which go together in pairs. For example in a programming language you rarely type an opening brace ({) without also needing the closing brace (}).
To help you keep these characters balanced, TextMate will insert the appropriate closing character after the caret when you type the opening one. If you type the closing character TextMate is smart enough to overwrite the auto-inserted one. If you type an opening character and then delete it using backward delete (⌫) then the auto-inserted character will also be deleted. If you only want to delete the auto-inserted character, use forward delete instead (⌦).
It is also possible to wrap a selection in an open/close character by selecting text and typing the opening character. For example if you type foo, select it and type ( then TextMate will make it (foo) placing the caret after the ending parentheses.
The actual character pairs are defined in the bundle preferences with different settings for different languages and contexts. For example, in source code an apostrophe is set up to have itself as a closing character, except for comments and strings. This is achieved using scope selectors.
Two useful shortcuts in relation to auto-paired characters (defined as macros in the Source bundle and overridden for a few languages) are:
⌘↩
Move to the end of the line and insert a newline.
For example if you write:
print("foo
Then you will have ") to the right of the caret and can now use ⌘↩ to skip these two characters and insert a new line.
⇧⌘↩
Move to the end of the line, insert a ; and then insert a newline.
TextMate has a simple yet effective completion function on ⎋ (escape). It will complete the current word based on matches in the current document. If there are multiple matches, you can cycle through these by pressing ⎋ continuously. It is also possible to cycle backwards using ⇧⎋.
The matches are sorted by distance from the caret, meaning candidates which are closer to the caret will be suggested before candidates farther away.
Two possibilities exist for augmenting this default completion. Both are done via bundle preferences.
The first option is to provide a list of candidates which should always be suggested. For example the Objective-C bundle has a list of commonly used Cocoa framework methods. This is an array of the candidates, e.g.:
completions = ( 'retain', 'release', 'autorelease', 'description' );
The other option is to set a custom shell command to gather the completions. The shell command will have the TM_CURRENT_WORD environment variable available (as the word which needs to be completed) along with the other variables.
For example the C bundle has a custom completion command setup for when the caret is inside the preprocessor include directive, it looks like this:
completionCommand = 'find "$TM_DIRECTORY" \
    -name "$TM_CURRENT_WORD*.h" -maxdepth 2 \
    -exec basename "{}" \;|sort';
This will find as matches, any file in the current directory (and direct sub-directories) which have the current word as prefix and an .h extension.
When you provide your own completion command (or list) you may want to disable the default matches. This can be done by setting disableDefaultCompletion to 1.
Each time you copy or cut text, the text is pushed onto a stack.
By pressing ⌃⌥⌘V you will see the list of all previous clippings and can pick the one you want to paste using arrow keys. Use return to insert it and escape to dismiss the list. If you dismiss the list, the currently selected clipping will be what gets pasted the next time you use the paste function.

Instead of having to pick the clip from the list, you can use ⇧⌘V to paste the previous clip in the list. Using that key again will advance to the clip before that and so on. To go back you can use ⌥⌘V. These key equivalents are useful when you want to make multiple copies from one document and then paste these LIFO-style (Last In First Out) into another document (or another location in the same document).
When pasting text, TextMate will estimate the indent of the text pasted as well as the current indent level and adjust the pasted text so that it matches the current indent.
The estimates are done using the indentation rules mentioned in the Re-Indent Text section.
If you temporarily want to avoid this you can paste text using ⌃⌘V. You can also permanently disable re-indented pasting in the Text Editing part of the Preferences.
You can enable or disable freehanded editing in the Edit → Mode submenu (⌥⌘E).
With this mode enabled caret movement will not be restricted by line endings or tab stops.
This is useful when working with ASCII diagrams, when inserting something at a given column on several lines (and you do not want to insert the padding) and in a few other situations.
When making column selections freehanded mode is (temporarily) enabled, allowing you to make selections past the end of lines.
It is also possible to place the caret beyond the end of a line by single-clicking the mouse while holding down the option key (⌥).
By enabling overwrite mode in the Edit → Mode submenu (⌥⌘O) characters already in the document will be overwritten as you type rather than inserted as normal.
This is useful when working with column data, e.g.:
foo     jaz
bar     sub
fud     dub
Imagine we want to overwrite some of the values in the first column. Somewhat similarly, we may have a line of a fixed width and want to replace part of it but preserve the width, for example we could have code like this where we must right-align the value to column 20 but want to overwrite the label:
printf("Value is %3d", 37).
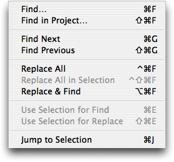
In addition to the standard find dialog, TextMate has a Find submenu (located in the Edit menu) which gives you key equivalents for find and replace actions.
The find dialog uses normal system controls for accepting input. You can toggle between single line and multi line text controls using the arrow next to the Replace text field.
If you need to insert a newline or tab character into either of the text fields, you can hold down option (⌥) while pressing the tab (⇥) or return (↩) key. This will insert a literal tab or newline character.
Two useful key equivalents are ⌘E and ⌘G. The first copies the selection to the shared find clipboard. This works in the majority of applications and allows you to find the next occurrence of that string by then pressing ⌘G.
The find clipboard works across applications so whether in Safari, TextEdit, Mail, TextMate, Terminal, Console, or similar, one can copy the selected text to the find clipboard, switch application and use ⌘G to find that string.
In addition TextMate offers ⇧⌘E to copy the selection to the replace clipboard. This is often useful to save a trip to the find dialog, for example if you want to replace newlines with the pipe character (|) for a list of items, select a newline, press ⌘E to use that as the find string. Now type a |, select it and press ⇧⌘E so that it is copied to the replace clipboard.
The next step is then to either press ⌃⌘F to perform the replacement in the entire document, or select the range in which you want the replacement to occur and use ⌃⇧⌘F instead.
In the Text menu there is a Shift Left and Shift Right action bound to ⌘[ and ⌘]. These will increase and decrease the indent by the size of one tab.
On many european key layouts these keys are rather awkward, so in addition to these, you can also use ⌥⇥ and ⌥⇤ (where ⇤ is achieved using ⇧⇥).
If you want to move a line/block up/down a few lines or move a word/column selection, it can be done by holding down ⌃⌘ and using the arrow keys to move the selection around. It also works for moving lines up/down without a selection.
If you have code which has broken indent, you can select it and use Text → Indent Selection (without a selection it indents the current line).
The rules for estimating the indent are setup per-language using bundle preferences. For more details see the indentation rules section.
Selecting text is achieved by holding down ⇧ while using the normal movement keys. In addition the Edit → Select submenu has actions to select current word, line, paragraph, enclosing brackets and entire document.
Sometimes there is a need for adding a suffix to lines of variable length, or maybe editing the last part of these lines.
Although you can use find and replace for this, an easier way is to select the lines that needs to be edited, then use Text → Edit Each Line in Selection (⌥⌘A) and the caret will be placed at the end of the first line in the selection.
You can now type new text, delete text or go back and edit existing text and this will be mirrored down through all the (previously selected) lines. To leave this mode, simply move the caret away from the current line.
It is possible to select column data either by holding down ⌥ and making the selection with the mouse, or making a regular selection and then pressing ⌥ once (which toggles between the two types of selection).
You can use all the normal actions on a column selection e.g. move selection, replace in selection, transpose (lines), actions from the Text menu, filter the selection through a shell command, etc.
Using arrow up/down with ⌥ will move the caret to the first/last row in the current column. Hold down ⇧ to get it selected.

For example if you have column data as shown above with the caret in front of foo, press ⌥⇧↓ and it will move the caret down in front of fud and leave the text between foo and fud selected.

You may now either want to press ⌥ once to switch to a zero-width column selection, then start typing to type on each line.

Alternatively use ⌥⇧→ and then ⌥ to leave the entire column selected (in column mode).

When using the tab key at the beginning of a line, TextMate will insert as many tabs as it estimates to be correct for that line. If the line already has text the caret will move to the front of this text.
If the line already has the correct indent (or above) a single tab will be inserted.
TextMate supports the system wide ‘Check Spelling as You Type’. This can be changed in the Edit → Spelling submenu.
You can bring up the context sensitive menu for a misspelled word to get spelling suggestions.
Since TextMate is intended for structured text it is possible to exclude parts of the document from being checked. This is done by creating a preferences item in the bundle editor, setting spellChecking to 0 and filling in the scope selector with the selector to target for no spell checking.
By default spell checking is disabled for source code except strings and comments and also for keywords, tags and similar in HTML, LaTeX, Markdown, etc.
TextMate can use spaces instead of tab characters. This is done by clicking the “Tab Size” pop-up in the status bar and enabling Soft Tabs.
This setting will only affect the current language and all languages with a common root that do not have the option set yet. The same applies to the state of spell checking, soft wrap and the actual tab size.

When soft tabs are enabled, TextMate will for the most part act exactly as if you were using hard tabs but the document does indeed contain spaces.
A lot of functionality in TextMate is provided through various bundles, many of which are language specific.
The default bundles are located in /path/to/TextMate.app/Contents/SharedSupport/Bundles. Normally you do not need to care about this, as you inspect (and edit) the bundles through the bundle editor (which can be reached through the Window menu).
If you select Bundles → Bundle Editor → Show Bundle Editor you will see the command center for customizing TextMate.
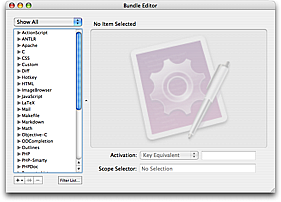
From this window you can create and edit things like snippets, commands, language grammars, etc. which will be explained in more detail in the following sections.
Most items edited in the Bundle Editor represent actions you want to execute while editing text. TextMate offers a few ways to do this and has a simple yet powerful system to understand the current context when evaluating which action the activation method should result in, called scope selectors, which is explained in a later chapter.
The easiest way to perform an action (from the keyboard) is in the form of a key equivalent. A key equivalent can be any key with optional modifiers and is configured by activating the key equivalent field and pressing the key to which the item should be bound.
![]()
If you want to disassociate a key equivalent with an item, press the X shown while the key equivalent field is in recording mode.
If multiple items are given the same key equivalent then a menu will appear when that key equivalent is pressed, as shown below (all of the items in the Math bundle are bound to ⌃⇧C so a menu with each key equivalent option is displayed).
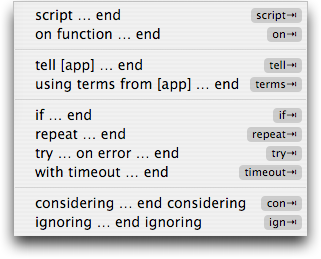
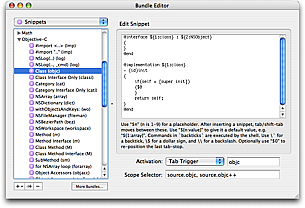
As well as assigning a single key equivalent to a bundle item, it is possible to assign a tab trigger to the item. This is a sequence of text that you enter in the document and follow it by pressing the tab key (⇥). This will remove the sequence entered and then execute the bundle item.
For example the Text bundle has a snippet which inserts the current date conforming to ISO 8601 (YYYY-MM-DD). The tab trigger for this snippet is isoD (short for ISO Date). In your document it is thus possible to type isoD and press tab to “expand” that to the current date.
This allows you to create much better mnemonics for your bundle items as you can literally type the thing you want to execute (e.g. the snippet to insert). It is generally a good idea to use actual words instead of abbreviations (like use list instead of lst) since the purpose is to make it easier to remember, so the tab trigger should generally be the first thing that pops into your mind in the unabbreviated form.
Tab triggers are rendered in the right side of the menu item with a slightly rounded rectangle as background and the tab character (⇥) shown as a suffix to the tab trigger.
Tab triggers are also useful when they match program keywords and lead to actions (such as inserting snippets) that do what you would normally do after entering the keyword. For example in Ruby a method starts with def so creating a snippet for a Ruby method and assigning it def as tab trigger gives a natural flow, as you would write def as usual and then use tab instead of taking the normal actions. Had the tab trigger for a method (in Ruby) instead been method or similar, it means you would have to remember “I can insert a snippet for this” before typing def, whereas with def as the tab trigger, you have to remember it before pressing the space after def (basically just pressing tab instead of space).
As with key equivalents, entering a tab trigger and pressing tab will show a menu, when multiple items share the same tab trigger. This can be used to provide a simple form of code-completion, for example in CSS the tab trigger list has been assigned to all properties that start with list. So in CSS typing list followed by tab will give a useful menu from where you can pick what list property needs to be inserted.
Some of the default items may not be to your exact liking, for example the coding style in snippets may differ from yours, so you may want other tab triggers, key equivalents, or similar modifications.
If you edit a default item the difference will be stored in ~/Library/Application Support/TextMate/Bundles. These are then merged with the default version so your changes will be effective even after upgrading TextMate. All new items you create also end up in this location.
Bundles or bundle items which you install by dragging them to TextMate or double clicking will be installed in ~/Library/Application Support/TextMate/Pristine Copy/Bundles. Editing these will also result in only the differences being stored in ~/Library/Application Support/TextMate/Bundles, meaning that if you later get a new version of this third party bundle, you can safely install this one on top of the old one (by dragging it to TextMate) and again your changes will be preserved.
If you want to discard local changes then currently the only option is to delete these from ~/Library/Application Support/TextMate/Bundles.
You can also transparently delete default bundles and bundle items from the bundle editor. However, since the items are shipped with the TextMate application, they are not removed on disk, since they would then reappear after an upgrade.
Instead each bundle has an info.plist file which keeps the ordering of bundle items and also stores which of the default items should act as if they have been deleted. When you change the ordering of items in a default bundle or delete items, this file is copied to ~/Library/Application Support/TextMate/Bundles/«bundle name».tmbundle and will contain this info.
If you delete an entire bundle the information is recorded in TextMate’s preferences. You can get a list of which default bundles have been deleted by running the following line in terminal:
defaults read com.macromates.textmate OakBundleManagerDeletedBundles
To reset the list of deleted bundles (i.e. undelete them) instead run this (while TextMate is not running):
defaults delete com.macromates.textmate OakBundleManagerDeletedBundles
This may all sound a little complicated, but generally you should not care about these details. Just use the bundle editor to create, edit and delete your items and bundles and it should work as expected.
Instead of deleting default bundles you may want to just hide them (since you never know if you someday will need some of the default ones).
This is done by clicking the Filter List… button below the list in the bundle editor. Here you can uncheck the bundles that you do not wish to have shown in the various lists of bundle items.
If you want to share a bundle or particular bundle item then you can drag it directly from the bundle editor (from the list in the left side of the window) to the Finder.
This item can then be sent to other people and they will be able to double-click it to install it. Note: this also works for single items, like a snippet or a command.
Often a bundle will provide support for a particular language (though there are exceptions like the Source, Text and TextMate bundles). To get a good idea of what features the bundle provides, it is best to investigate it in the bundle editor (accessible from the Windows menu). When appropriate, a language bundle should provide the following, with key bindings as shown:
Build (⌘B) — build the current source/project. Normally that means compile it.
Run (⌘R) — run the current source (script) or product from building a project.
Documentation for Word (⌃H) — lookup the current word (or “unit”) in the documentation (often online).
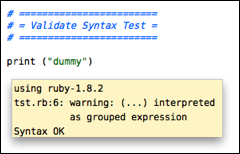
Validate Syntax (⌃⇧V) — run the syntax through whatever form of syntax checker exist for the current document type. Generally show errors as a tool tip, but for more complex validation, HTML output is sometimes used.
Wrap in «Something» (⌃⇧W) — wrap the selection in what makes sense for the current document type, e.g. open/close tags in HTML, begin/end environment in LaTeX.
Convert to «Something» (⌃⇧H) — convert the document into something which makes sense, e.g. for HTML run it through tidy, for Markdown convert it to HTML, for an XML property list convert it to the more readable ASCII version, etc. Generally this is done in-place, overwriting the current document.
Continue «Something» (⌅) — continue the current construct on the next line e.g. a line comment, list item or similar.
Preview Document (⌃⌥⌘P) — by default this opens the Web Preview, but it has been overloaded for some markup languages for a preview more suited for that language (i.e. doing the HTML conversion and setting up a basic style sheet before showing it).
Insert Close Element (⌥⌘.) — by default this inserts the appropriate closing tag (HTML) but is overloaded in some contexts to insert whatever constitutes a close element (e.g. \end{environment} in LaTeX).
Comment Toggle (⌘/) — toggle comment characters around the current line or selection.
Many bundles also have a Help command with some details about how to use and customize its functionality.
Bundle actions can be accessed through the gear pop-up in the status bar. This menu can also be brought up by pressing ⌃⎋.
![]()
Below are a few highlights from miscellaneous bundles.
The Diff bundle provides a language grammar for the output produced by the diff shell command.
You can show the differences between two files in TextMate by running the following command from your terminal:
diff -u old_file new_file|mate
The bundle also has commands to show the differences between the current document and the saved copy, between the selected files in the project drawer (with an HTML output option) and it has a command to open the selected files in Apple’s FileMerge using opendiff (requires the developer tools to be installed).
The HTML bundle contains useful stuff for working with HTML. A few particularly useful actions are:
Insert Open/Close Tag (⌃<) — this command will take the word just typed and change it into <word></word> placing the caret in the middle. It will recognize those tags where a close tag is not allowed (like hr) and instead insert <word> placing the caret after the tag.
Wrap Selection in Open/Close Tag (⌃⇧W) — this will put <p>…</p> around the selection but allows you to overtype the p (and add arguments). After you are done, press tab to move the caret past the </p> tag.
Wrap Selection as Link (⌃⇧L) — this turns the selection into link text for an anchor where you can then fill in the URL.
The HTML bundle also has a drag command for images which insert the dropped image with proper dimensions (width/height) and an alternative text derived from the file name.
A lot of actions in the HTML bundle will cause tags to be inserted. E.g. pressing ⌃↩ inserts <br>, dropping an image on a HTML document inserts <img …>, etc.
If you want tags with an EMPTY content model to use the minimized (XHTML) form (that is <br /> instead of <br>) then in Preferences → Advanced create a new variable named TM_XHTML and set it to ‘ /’ (the value of this variable will be inserted before the > in the generated tags with EMPTY content model).
For the records have a look at Sending XHTML as text/html Considered Harmful before embracing XHTML.
Three commands of special interest in the LaTeX bundle are:
Typeset & View (PDF) (⌘B) — this will run pdflatex on your current file, or TM_LATEX_MASTER (if that variable is set). If there were errors, these are shown as clickable links, otherwise the resulting PDF will be shown in the HTML output (requires Tiger or Schubert’s PDF Browser PlugIn).
Insert Environment Based on Current Word (⌘{) — this mimics the HTML bundles ⌃< in that it makes the current word into \begin{word} … \end{word} and places the caret in between. There are various configuration options for this command, for details see the Help command in the LaTeX bundle or the source for the command itself (via the Bundle Editor).
Insert Command Based on Current Word (⌘}) — like the previous command, but makes word into \word{} with the caret inside the braces.
If you have not installed LaTeX you can use the i-installer (binaries).
Alternatively, if you have MacPorts then open your terminal and run:
sudo port install teTeX
The source bundle contains default actions and preferences for source code. Of interest is the Comment Line / Selection (⌘/) which will toggle the comment characters for the current line or selection. This command is setup for different languages via three context dependent variables.
The various macros to go to end-of-line and insert the line terminator character (; by default) and/or a newline are also rather useful.
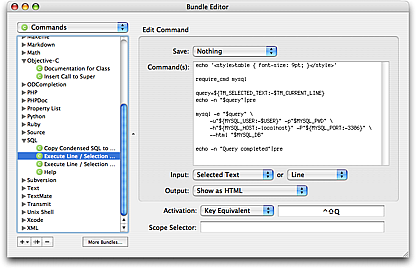
The SQL bundle has a command that can submit the current line or selection as a MySQL or Postgres query (⌃⇧Q) and show the result using HTML output.
It uses a few environment variables to store connection details. These are described in the bundle’s Help file.
All actions in the subversion bundle are accessible through ⌃⇧A. These offer the commands which would be used in a common workflow.
None of the commands are made to prompt you for a password. For repositories offered through WebDav (i.e. http or https) svn should cache your authentication. This post describes how to generate an ssh key pair for secure-shell tunneling (ssh).
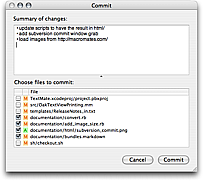
The commit action will commit the files selected in the project drawer or current file if there is no selection. The commit window also allows you to exclude files before doing the actual commit.
In the commit window you can use enter (⌅) to trigger the “Commit” button shown in the bottom right corner.
The text bundle is for actions and preferences related to basic text editing. From a users perspective some of this should probably have a more native placement than being in a bundle.
The four probably most useful actions are:
Delete Line (⌃⇧K) — delete the current line.
Document Statistics (⌃⇧N) — this provides a tool tip which show how many lines, words and characters the current document contains.
Duplicate Line / Selection (⌃⇧D) — this will duplicate the current line, leaving the caret in the same column on the new line, or if there is a selection, duplicate that.
Sort Lines in Document / Selection (F5) — this will sort the lines or selection alphabetically.
The TextMate bundle is kind of a meta bundle. That means none of the actions are for text editing but are instead intended for creating new bundle items, searching the mailing list archive, pasting the current selection to an IRC channel or similar.
One command which is useful when working on themes or language grammars is the Show Scope (⌃⇧P) which shows the current scope of the caret (more about scopes later).
The Xcode bundle has actions to build the Xcode project located in the folder that contains the current document or project and to run the resulting target.
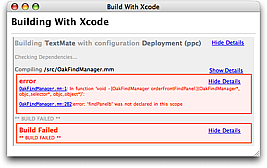
It also has commands to import an Xcode project but generally it is better to drag the folder with your Xcode project to the TextMate application icon, since currently the TM_PROJECT_DIRECTORY variable is not correctly setup for imported projects and a lot of bundle actions rely on this (e.g. the Subversion stuff).
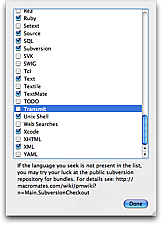
Only the most popular bundles are included with TextMate. There is a subversion repository which has dozens of other bundles mostly adding support for various languages. You can see the list of bundles here.
If you are not using Leopard you will need to install the subversion client.
If you have MacPorts then open your terminal and run:
sudo port install subversion
If you use Fink then install the svn-client package.
If you have neither Fink or MacPorts you can grab subversion from Martin Ott’s homepage or any of the pre-build binaries from here.
LC_CTYPEYou must set the LC_CTYPE variable to use UTF-8. If you do not, svn will give you an svn: Can't recode string error when it stumbles upon non-ASCII filenames (some of the bundle items use these).
If you are using bash you should put this in your ~/.bash_profile (or a similar file which gets sourced when you open a terminal):
export LC_CTYPE=en_US.UTF-8
Users of zsh should put it in ~/.zshrc and tcsh users should instead put this line in their ~/.tcshrc:
setenv LC_CTYPE en_US.UTF-8
Remember that after adding this, you need to start a new shell for the updated profile to take effect.
Also be aware that the LC_ALL environment variable takes precedence over LC_CTYPE, so if you have set this elsewhere you should either unset it or change that to use UTF-8.
When you have svn installed it is relatively easy to either checkout or export a bundle. TextMate searches for bundles in all the usual library locations, so if you have the rights to do so (on your machine) it is recommended that you perform all checkouts to /Library instead of ~/Library, since this then keeps installed bundles separate from custom bundles (or bundles you have edited).
As an example, to install the Haskell bundle, first create the install directory, then change to it and ask svn to check it out:
mkdir -p /Library/Application\ Support/TextMate/Bundles
cd /Library/Application\ Support/TextMate/Bundles
svn co http://svn.textmate.org/trunk/Bundles/Haskell.tmbundle
At a later time you can update the bundles which you have installed by executing these two lines:
cd /Library/Application\ Support/TextMate/Bundles
svn up *.tmbundle
If TextMate is running while you perform the update, you may want to also execute the following line:
osascript -e 'tell app "TextMate" to reload bundles'
This is equivalent to selecting Bundles → Bundle Editor → Reload Bundles from within TextMate.
Included with TextMate is a support folder which contains miscellaneous support items used by various bundle items. This folder is reachable via the TM_SUPPORT_PATH environment variable and would normally point to /Applications/TextMate.app/Contents/SharedSupport/Support.
If you checkout a bundle from the subversion repository then this bundle may rely on a newer version of the support folder than the one included with TextMate. If this is the case, you will need to also checkout a local copy of the support folder.
The process is similar to checking out a bundle, first ensure you have LC_CTYPE setup properly and then execute the following in your shell:
cd /Library/Application\ Support/TextMate
svn co http://svn.textmate.org/trunk/Support
After this you can test it by pasting the following line into TextMate and pressing ⌃R (to execute it):
echo "$TM_SUPPORT_PATH"
It should result in the following output:
/Library/Application Support/TextMate/Support
The support folder contains a version file (named version) so rather than pick the most local version of the support folder, TextMate will choose the one with the highest version. This means that if you do checkout a local copy of the support folder and later update TextMate, your local (potentially outdated) copy will not eclipse the default one.
Changes made to bundles are not part of the normal release notes. Instead these are available through an RSS feed.
TextMate supports recordable macros. A macro is recorded by selecting Macros → Start Recording from the Bundles menu.
While recording, a red dot will pulsate in the right part of status bar and all text editing actions are recorded together with things like Find, running commands, inserting snippets etc. When done, you select Stop Recording and can either replay the recorded macro or save it for later use.
When saving a macro, it will appear in the bundle editor as (currently) a read-only macro which can get an activation sequence and scope selector, just like any other bundle item.
It is possible to set whether or not the macro should use a local clipboard while being executed. The local clipboard is generally advantageous (thus the default) but sometimes you may want the macro to affect the “real” clipboard and can disable this option.
A snippet is a piece of text that you would like to insert in your document. It can include code to run at insertion time, variables (like selected text), tab stops/placeholders for missing information (which you can tab through after insertion) and perform transformations on the data which you enter in the placeholders.
In the simplest case, you can use snippets to insert text that you do not want to type again and again, either because you type it a lot, or because the actual text to insert is hard to remember (like your bank account details or the HTML entities for the Apple modifier keys).
If you use snippets to insert plain text there is only one thing you should be aware of: $ and ` are reserved characters. So if you want to insert one of these, prefix it with an escape (i.e. \$). An escape not followed by one of these two characters (or followed by another escape) will be inserted as a literal character.
You can insert the value of a variable by prefixing the name of the variable with $. All the normal dynamic variables are supported, the most useful probably being TM_SELECTED_TEXT. If for example we want to create a snippet which wraps the selection in a LaTeX \textbf command, we can make a snippet which is:
\textbf{$TM_SELECTED_TEXT}
If no text is selected the variable will not be set, so nothing will be inserted in its place. We can provide a default value by using this syntax: ${«variable»:«default value»}. For example:
\textbf{${TM_SELECTED_TEXT:no text was selected}}
The default value can itself contain variables or shell code. If you want the default text to contain a }, you need to escape it. But all other characters are used verbatim.
Variables also support regular expression replacements using this syntax: ${«variable»/«regexp»/«format»/«options»}. If the variable is not set the replacement will be performed on the empty string. For example, to prepend a bullet to each non-empty line in the selection (and insert that) we can do:
${TM_SELECTED_TEXT/^.+$/• $0/g}
You can use backticks to have shell code executed when the snippet is inserted. The result from running the code gets inserted into the snippet, though with the last newline in the result removed (if present). So for example to create a snippet that wraps the selection in an HTML link, where the URL of that link comes from the clipboard, we can do:
<a href="`pbpaste`">$TM_SELECTED_TEXT</a>
Since this is normal bash code, we can write a small program. For example we can let it verify that the clipboard contains only a single line of text like this:
<a href="`
    if [[ $(pbpaste|wc -l) -eq 0 ]]
        then pbpaste
        else echo http://example.com/
    fi
`">$TM_SELECTED_TEXT</a>
Inside shell code, the only character you need to escape is the backtick.
After insertion, the caret will be placed after the last character of the snippet. This is not always desirable and we can change that by using $0 to mark where we want the caret to be. So if for example we make an HTML div-snippet and want the caret to end between the opening and closing tags, we could make it like this:
<div>
    $0
</div>
Often though we want to fill in text in several places in the snippet. Multiple tab stops can be provided by inserting $1-$n. The caret will start at $1, then when pressing tab it will move to $2 and $3 on next tab etc. until there are no more tab stops. If you do not explicitly set $0, the caret will be at the end of the snippet.
So we could for example change the above to:
<div$1>
    $0
</div>
This allows us to fill in an argument and then tab on to $0.
Like variables, tab stops can also have default values (and are generally referred to as placeholders when they do). The syntax is the same: ${«tab stop»:«default value»}. And the default value can contain both text, shell code and other placeholders. So we can refine the previous example further:
<div${1: id="${2:some_id}"}>
    $0
</div>
Inserting this snippet will insert a div tag with the id argument selected and we can then decide either to overtype the argument (i.e. delete it) and press tab again to reach $0, or we can press tab immediately to get to the second tab stop (the value part of the argument) and edit that.
When you edit the placeholder text, any embedded tab stops will be removed.
There are times when you need to provide the same value several places in the inserted text and in these situations you can re-use the tab stop to signal that you want it mirrored at that location. So for example to create a LaTeX environment with a snippet, we can use:
\begin{${1:enumerate}}
    $0
\end{$1}
After inserting this snippet, enumerate will be selected and if we edit it, the changes will be reflected in the \end part as well.
There are situations where we want our placeholder text mirrored but with slight changes or where we want some text to appear depending on the value/presence of a placeholder.
We can accomplish this by doing a regular expression substitution on the placeholder text (when mirroring it). The syntax for this is: ${«tab stop»/«regexp»/«format»/«options»}.
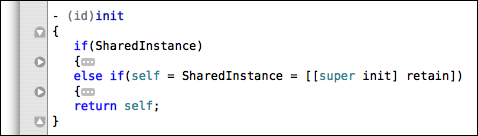
As an example, the Objective-C getter/setter methods (prior to the @property keyword) often look like this (in the thread-unsafe form):
- (id)foo
{
    return foo;
}

- (void)setFoo:(id)aValue
{
    [foo autorelease];
    foo = [aValue retain];
}
In the format string we can use \u to uppercase the next character, so a snippet that only asks for the name of the instance variable once could look like this:
- (${1:id})${2:foo}
{
    return $2;
}

- (void)set${2/./\u$0/}:($1)aValue
{
    [$2 autorelease];
    $2 = [aValue retain];
}
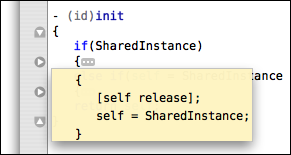
We can also use conditional insertions in the format string to make decisions. For example if we create a snippet for a method we can let the return type decide whether or not the method should include a return statement like this:
- (${1:void})${2:methodName}
{${1/void$|(.+)/(?1:\n\treturn nil;)/}
}
Here we match placeholder 1 against void or anything (.+) and put the latter match in capture register 1. Then only if we did match something (other than void) will we insert a newline, tab and the return nil; text.
The shell is a scripting language used to piece together various programs (shell commands), and often in an interactive way, e.g. as done when launching Terminal and entering commands to execute.
For a thorough introduction to the shell scripting language have a look at this shell tutorial provided by Apple.
TextMate allows shell commands to be executed in different contexts. Some of the more useful options are:
In the current document, either press ⌃R with no selection to run the current line as a shell command, or select one or more lines and use ⌃R to run the selection as a shell script (it supports shebang as well).
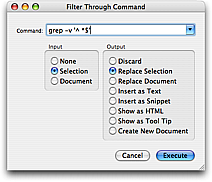
From the Text menu you can select Filter Through Command… (⌥⌘R) which opens a panel where you can enter a shell command to run and set what should be given as input (stdin) plus what to do with the output of the command (often you want to set input to the selected text and let the output replace the selection).
Commands via the Bundle Editor. The first two options are mostly for one-shot commands, whereas commands created in the Bundle Editor are for stuff you want to run again later. The options here are the same as those of option 2, i.e. you can set what to do with input/output, even have the output shown as a tool tip (e.g. for commands which lookup help for the current word) or HTML (e.g. for commands which build the project and show results, incrementally). You can also set that documents should be saved before executing the command and give the command a key equivalent or tab trigger.
When running a command from Terminal, the shell will use the value of the PATH variable to locate it (when it is specified without an absolute location). For example ruby is located in /usr/bin/ruby and svn is (for me) located in /opt/local/bin/svn.
TextMate inherits the value of PATH from Finder, which has only a few search locations specified, so for many users, it is necessary to augment this PATH if they need TextMate to find git, pdflatex, or similar commands not included with Mac OS X.
There are two ways to setup PATH for TextMate. Either via Preferences → Advanced → Shell Variables or by editing ~/.MacOSX/environment.plist.
The former is by far the simplest, the latter is a property list with environment variables read by Finder when you login, so values set here should affect all applications.
Environment variables are used extensively in TextMate to provide scripts and commands with information.
Here is how to read the value of a variable (named VAR) in different scripting languages:
"$VAR"$ENV{'VAR'}$_ENV['VAR']os.environ['VAR'] (remember to import os first)ENV['VAR']You can use them directly in Snippets, like in bash. Both bash and snippets support an extended form (${VAR}) where it is possible to do replacements in the variable, provide fallback values (if it is unset) etc.
Remember to double-quote variables used in shell scripts, otherwise bash will first expand the variable to its value and then split this according to the input-field-separator characters (read as the IFS variable, defaults to spaces, tabs and newlines). This means if TM_FILENAME is My Document.txt and we execute rm $TM_FILENAME then rm will actually get two arguments, first one being My and the second one being Document.txt.
For info about what can be done with environment variables in bash, see this blog post about the issue or check out the bash man file.
The following variables reflect the users current configuration, which file he has open, where the caret is located in that file, the selection in the project drawer and so on.
A script can read these variables and make decisions accordingly.
Some of the variables are not always present. For example if the current file is untitled, or there is no selection, the corresponding variable will be unset. This is useful for example to make a command work with the selection, but fall back on the current line or word.
Bash has shorthand notation for providing a default value when a variable is not set, for example to fallback on the current word when there is no selection, we would use: "${TM_SELECTED_TEXT:-$TM_CURRENT_WORD}".
TM_BUNDLE_SUPPORT — shell commands which are (indirectly) triggered from a bundle item (which could be a Command, Drag Command, Macro, or Snippet) will have this variable pointing to the Support folder of the bundle that ran the item, if such a folder exists. In addition, $TM_BUNDLE_SUPPORT/bin will be added to the path.
TM_CURRENT_LINE — textual content of the current line.
TM_CURRENT_WORD — the word in which the caret is located.
TM_DIRECTORY — the folder of the current document (may not be set).
TM_FILEPATH — path (including file name) for the current document (may not be set).
TM_LINE_INDEX — the index in the current line which marks the caret’s location. This index is zero-based and takes the utf-8 encoding of the line (e.g. read as TM_CURRENT_LINE) into account. So to split a line into what is to the left and right of the caret you could do:
 echo "Left:  »${TM_CURRENT_LINE:0:TM_LINE_INDEX}«"
 echo "Right: »${TM_CURRENT_LINE:TM_LINE_INDEX}«"
TM_LINE_NUMBER — the carets line position (counting from 1). For example if you need to work with the part of the document above the caret you can set the commands input to “Entire Document” and use the following to cut off the part below and including the current line:
head -n$((TM_LINE_NUMBER-1))
TM_PROJECT_DIRECTORY — the top-level folder in the project drawer (may not be set).
TM_SCOPE — the scope that the caret is inside. See scope selectors for information about scopes.
TM_SELECTED_FILES — space separated list of the files and folders selected in the project drawer (may not be set). The paths are shell-escaped, so to use these, you need to prefix the line with eval (to make the shell re-evaluate the line, after expanding the variable). For example to run the file command on all selected files in the project drawer, the shell command would be:
eval file "$TM_SELECTED_FILES"
It is also possible to convert it to an (bash) array and iterate over this, for example:
 eval arr=("$TM_SELECTED_FILES")
 for (( i = 0; i < ${#arr[@]}; i++ )); do
     file "${arr[$i]}"
 done
TM_SELECTED_FILE — full path of the first selected file or folder in the project drawer (may not be set).
TM_SELECTED_TEXT — full content of the selection (may not be set). Note that environment variables have a size limitation of roughly 64 KB, so if the user selects more than that, this variable will not reflect the actual selection (commands that need to work with the selection should generally set this to be the standard input).
TM_SOFT_TABS — this will have the value YES if the user has enabled soft tabs, otherwise it has the value NO. This is useful when a shell command generates an indented result and wants to match the users preferences with respect to tabs versus spaces for the indent.
TM_SUPPORT_PATH — the TextMate application bundle contains a support folder with several items which are used by some of the default commands (for example CocoaDialog, Markdown, the SCM commit window, Textile, tidy, etc.). This variable points to that support folder. Generally you would not need to use the variable directly since $TM_SUPPORT_PATH/bin is added to the path, so using some of the bundled commands can be done without having to specify their full path.
TM_TAB_SIZE — the tab size as shown in the status bar. This is useful when creating commands which need to present the current document in another form (Tidy, convert to HTML or similar) or generate a result which needs to match the tab size of the document. See also TM_SOFT_TABS.
In addition to the dynamic variables, which TextMate provides automatically, it is sometimes useful to provide a list of static variables.
For example you may have templates or snippets that should insert your company name and prefer not to put the value directly in these, or there could be shared commands which need localized settings, for example the SQL bundle has a query command which use variables for username, password and database.
For this reason it is possible to set a default list of environment variables in Preferences → Advanced → Shell Variables.
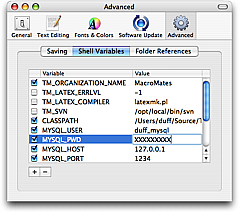
These variables are given to all shell commands started from TextMate and can also be used in snippets (as can the dynamic variables for that matter).
Some variables are a cross between dynamic and static. For example the Source bundle contains a Toggle Comment command which will toggle the comment for the current line or selection. This command uses three variables to decide what type of comment style the user wants.
A user who works with multiple languages will however need to specify this per language. This can be done by setting the shellVariables array in the bundle preferences and provide the proper scope selector to limit these variables.

This has the advantage of actually being based on the carets location, which for the Toggle Comment command allows us to have it work differently for JavaScript, CSS, HTML and embedded PHP + Ruby, all in the same document.
An example of setting the 3 variables to comment the entire block (instead of line-by-line) with the HTML/SGML/XML comment markers is shown here:
shellVariables = (
   {  name = 'TM_COMMENT_START';
      value = '<!-- ';
   },
   {  name = 'TM_COMMENT_END';
      value = ' -->';
   },
   {  name = 'TM_COMMENT_MODE';
      value = 'block';
   },
);
Sometimes it is useful to have a command customized differently depending on the project. For this reason, it is possible to set variables for individual projects.
The way to do this is currently a little secret but if you deselect everything in the project drawer, then click the info (circled I) button, a panel will appear where you can set variables.
These variables are saved in the project file (*.tmproj) and will exist only for snippets and (shell) commands executed in the context of that project.
Commands are scripts interpreted by bash or the interpreter specified at the top using shebang notation (e.g. #!/usr/bin/ruby).
Editing commands is done from the Bundle Editor which you can open by selecting Bundles → Bundle Editor → Edit Commands…
TextMate can save either the current document or all modified documents in the project, before running the command. This is set using the top pop-up control. A document will only be saved when it has been modified.
When running a command the various environment variables will be available for the command to read and use. In addition, the command can read either the entire document or the selected text as input (stdin).
If the input is set to “Selected Text” and there is no selection, the command will instead get the fallback unit specified in the additional input pop-up control. If the fallback unit is used and the output is set to “Replace Selection” then the unit used as input will be replaced. So if we make a command like tr '[a-z]' '[A-Z]' (uppercase text) and set input to Selected Text but fallback to word and set output to replace selected text, then running the command with no selection, will uppercase the current word.
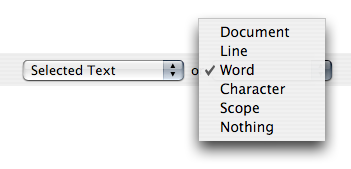
One fallback unit which requires a little explanation is Scope. When the input is set to this, TextMate will search backwards and forwards for the first character which is not matched by the scope selector of the command and use those as boundaries for the input.
This means that if the language grammar marks up URLs and gives these a scope of markup.underline.url then a command with that as the scope selector can set its input to Selection or Scope and will thus get the URL as input, when this command is executed with the caret on an URL.
When a command name is shown outside the bundle editor (like in the menus) and a fallback unit is provided then TextMate will substitute “Unit / Selection” (in its name) with either “Unit” or “Selection” depending on whether or not text is selected. The text used for Unit should be a single word representing the fallback unit, i.e. Character, Word, Line, Scope (or what the scope represents, but as a single word), or Document. So if you make a command with the name “Encrypt Document / Selection” and specify its input as Selected Text, but with Document set as a fallback, this command will be presented as “Encrypt Document” when no text is selected, otherwise “Encrypt Selection.”
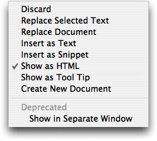
TextMate can do miscellaneous things with the output (stdout) of a command, the options are:
Replace Selected Text / Document — this output option is mainly for commands which transform the selection/document, for example running the document through tidy or sort the lines read from stdin.
Insert as Text / Snippet — commands which generate output to be inserted in the document, for example inserting missing close tag (by parsing the document read from stdin down to the caret position) or similar.
Show as Tool Tip — commands which are mainly actions, like submit the selection to a pasting service or similar can discretely report the status of the action using just a tool tip.
Show as HTML — this output option simply shows the output as HTML, but has some additional advantages mentioned in next section. It is especially useful for commands which need to report incremental progress, as shown with the Xcode Build below.
Create New Document — with some transformations (like converting a Markdown document to HTML) it may be preferable to open the result in a new document rather than overwrite the existing document and that is what this option is for. There are also commands for which the result is best shown as a document, for example the output from diff can be shown as a (new) document to get nice syntax coloring.
The HTML output option has a few advantages in addition to providing access to WebKit’s HTML and CSS engine.
The HTML output does not stall TextMate while the command is running. A progress indicator is shown in the upper right hand corner while the command is running and it can be aborted by closing the output window (a confirmation requester is presented).
![]()
JavaScript running as part of the output has access to a TextMate object with a system method that mimics the one provided to Dashboard widgets. The TextMate object also has an isBusy property which can be set to true or false to control the windows progress indicator. So in the simplest case, to allow the user to start/stop the progress indicator one could make a command like this:
cat <<'EOF'
   <a href="javascript:TextMate.isBusy = true">Start</a>
   <a href="javascript:TextMate.isBusy = false">Stop</a>
EOF
To create a link which opens the user’s browser, one could use the system method like this:
cat <<'EOF'
   <a href="javascript:TextMate.system(
      'open http://example.com/', null);">Open Link</a>
EOF
The system method allows starting (and stopping) of commands asynchronously, reading standard out/error from the command and sending data to the commands standard input. For further information see the Dashboard documentation.
The HTML output allows the use of the TextMate URL scheme to link back to a given document. This is useful either when the command reports errors (or warnings) with the current document (e.g. a build command or a validator) or when the command refers to other files in the project, e.g. svn status.
Using either Tiger or Schuberts PDF Browser Plug-in it is possible to have the HTML output show PDF files. Mainly this is useful for typesetting programs like LaTeX, where it is then possible to typeset and view the result without leaving TextMate.
It is possible to redirect to other pages and thereby treat the HTML output as a shortcut to your browser. For example in PHP the “Documentation for Word” command outputs a line like this:
echo "<meta http-equiv='Refresh'
        content='0;URL=http://php.net/$TM_CURRENT_WORD'>"
Due to a (presumed) security restriction with WebKit it is not possible to have the HTML output redirect, link or reference files on your disk via the file: URL scheme. Instead you can use the tm-file: URL scheme, which works exactly like file:, but does not have this cross-scheme restriction.
For a longer post about how the HTML output can be used visit the TextMate blog.
There are situations where it is useful to change the output option of a command from within the command. For example a command which looks up documentation for the current word may want to show a “no documentation found” tool tip for when there is no documentation, but otherwise use the HTML output option for the result.
TextMate has a few predefined bash functions which can be used for this purpose. They optionally take a string as an argument which is first echo’ed to stdout.
These functions only work when the initial output option is not set as “Show as HTML”. The list of functions is as follows:
exit_discardexit_replace_textexit_replace_documentexit_insert_textexit_insert_snippetexit_show_htmlexit_show_tool_tipexit_create_new_documentSo for example the Diff bundle has a “[Diff] Document With Saved Copy” that compares the current document with the version saved on disk. The default output option for that is to create a new document (showing the diff output with syntax highlighting), but it will show an error (as a tool tip) if there is no file on disk. This can be done using the following command:
if [[ -e "$TM_FILEPATH" ]] # does the file exist?
   then diff -u "$TM_FILEPATH" -
   else exit_show_tool_tip "No saved copy exists."
fi
When running commands there are a few predefined bash functions which might be useful:
require_cmd — ensure that the command given as the first argument exists in the path and otherwise report an error to the user and abort the command. This is useful if you rely on commands not shipped with OS X and want to distribute your work, for example the Subversion commands start by doing:
require_cmd svn
rescan_project — currently TextMate will only update the project drawer (and reload the current file if it was changed externally) when regaining focus. This bash function is shorthand for using AppleScript to deactivate and reactivate TextMate. It is useful if your command either modifies the current document (on disk) or changes files in folders which are part of the current project.
pre — this command reads text from stdin and outputs an HTML-escaped version to stdout, putting the entire thing in <pre>…</pre> (though with word wrap enabled) and converting <, > and & to the corresponding HTML entities. This is useful when you want to show raw output but use the HTML output option. In the simplest case you can just specify pre as the command and set input to “Entire Document” and output to “Show as HTML”, but generally you would probably want the result from some command to be piped through pre, for example:
make clean|pre
The functions mentioned above are all defined in $TM_SUPPORT_PATH/lib/bash_init.sh. There are also functions to aid in HTML construction (from bash) in $TM_SUPPORT_PATH/lib/html.sh, but this file is not sourced by default. So to use the functions defined in that file you would start by sourcing it e.g.:
. "$TM_SUPPORT_PATH/lib/html.sh"
redirect "http://example.com/"
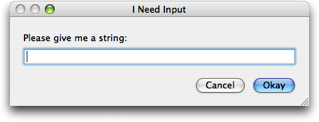
TextMate ships with CocoaDialog so this can be used out-of-the-box. You call CocoaDialog (follow the link for full documentation) with the type of dialog you want and it will return two lines of text, the first is the button pressed (as a number) and the second is the actual result. While a little cumbersome, here is an example of how to request a line of text and only proceed if the user did not cancel:
res=$(CocoaDialog inputbox --title "I Need Input" \
    --informative-text "Please give me a string:" \
    --button1 "Okay" --button2 "Cancel")

[[ $(head -n1 <<<"$res") == "2" ]] && exit_discard

res=$(tail -n1 <<<"$res")
echo "You entered: $res"
We first call CocoaDialog to get a string of text. Then we test if the first line returned (using head) is equal to 2, which corresponds to the Cancel button and if so, we exit (using the discard output option). We then go on to extract the last line of the result and echo that.
Another common dialog type is the progress indicator. The determinate version reads from stdin the value and text to use for each step. This means we can simply pipe that info to CocoaDialog in each step of our command, a simple example could be:
for (( i = 1; i <= 100; i++ )); do
    echo "$i We're now at $i%"; sleep .05
done|CocoaDialog progressbar --title "My Program"

Often though we want to show the indeterminate version. This dialog stays onscreen for as long as its stdin is open. This means we can use a pipe like above but if we want a result back from the command that we are executing, we can instead redirect the commands stderr to an instance of CocoaDialog (using process substitution), this is shown in the following example:
revs=$(svn log -q "$TM_FILEPATH"|grep -v '^-*$' \
    2> >(CocoaDialog progressbar --indeterminate \
        --title "View Revision…" \
        --text "Retrieving List of Revisions…" \
    ))
echo "$revs"

CocoaDialog also has other dialog types, like a pop-up list, file panel, text box and so on, but as an alternative there is also AppleScript.
If you open Script Editor and then open the Standard Additions dictionary (via Open Dictionary…) there are commands under User Interaction which allow various dialogs. One caveat though, in current version (1.5) TextMate will not listen to AppleScript commands while executing shell commands with an output option other than Show as HTML. This means that instead of targeting TextMate, you should use SystemUIServer or similar and in addition to that, since SystemUIServer needs to be activated to show the dialog (with focus) you need to reactivate TextMate. Here is an example of a command that allows selecting an item from a list:
res=$(osascript <<'AS'
    tell app "TextMate"
        activate
        choose from list { "red", "green", "blue" } \
            with title "Pick a Color" \
            with prompt "What color do you like?"
    end tell
AS)

echo "You selected: $res"

osascript -e 'tell app "TextMate" to activate' &>/dev/null &
The first part is just a small AppleScript which is executed from shell via osascript (reading the script from stdin using a here-doc). The last part is the line that gives focus back to TextMate but because TextMate will not respond to this event before the shell command has completed its execution, we need to run it asynchronously, which is done by adding & to the end of the command. The &>/dev/null part is to detach stdout/error from the shell command so that this does not cause a stall.
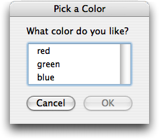
Drag commands are like normal commands but they are activated by dropping a particular file type (specified as a list of file type extensions) into the editing window.
![]()
The output from executing a drag command is always inserted as a snippet and the drag command has three (additional) environment variables available:
TM_DROPPED_FILE — relative path of the file dropped (relative to the document directory, which is also set as the current directory).
TM_DROPPED_FILEPATH — the absolute path of the file dropped.
TM_MODIFIER_FLAGS — the modifier keys which were held down when the file got dropped. This is a bitwise OR in the form: SHIFT|CONTROL|OPTION|COMMAND (in case all modifiers were down).
So here is a slightly complex drag command:
img="$TM_DROPPED_FILE"
echo -n "<img src=\"$img\" "

sips -g pixelWidth -g pixelHeight "$img" \
|awk '/pixelWidth/  { printf("width=\"%d\" ",  $2) }
      /pixelHeight/ { printf("height=\"%d\" ", $2) }'

base=${img##*/}
alt=$(tr <<<${base%.*} '[_-]' ' '|perl -pe 's/(\w+)/\u$1/g')
echo -n "alt=\"\${1:$alt}\">"
First we output the <img src="…" part. Then we use sips to query the image and awk to parse the output from sips and output the proper width="…" and height="…" arguments. Last we convert - and _ in the path to spaces and capitalize each word and output this as the final alt="…" argument, where we make this text a placeholder (since the entire thing is inserted as a snippet).
![]()
Language grammars are used to assign names to document elements such as keywords, comments, strings or similar. The purpose of this is to allow styling (syntax highlighting) and to make the text editor “smart” about which context the caret is in. For example you may want a key stroke or tab trigger to act differently depending on the context, or you may want to disable spell check as you type those portions of your text document which are not prose (e.g. HTML tags).
The language grammar is used only to parse the document and assign names to subsets of this document. Then scope selectors can be used for styling, preferences and deciding how keys and tab triggers should expand.
For a more thorough introduction to this concept see the introduction to scopes blog post.
You can create a new language grammar by opening the bundle editor (Window → Show Bundle Editor) and select “New Language” from the add button in the lower left corner.
This will give you a starting grammar which will look like the one below, so let us start by explaining that.
 1  {  scopeName = 'source.untitled';
 2     fileTypes = ( );
 3     foldingStartMarker = '\{\s*$';
 4     foldingStopMarker = '^\s*\}';
 5     patterns = (
 6        {  name = 'keyword.control.untitled';
 7           match = '\b(if|while|for|return)\b';
 8        },
 9        {  name = 'string.quoted.double.untitled';
10           begin = '"';
11           end = '"';
12           patterns = (
13              {  name = 'constant.character.escape.untitled';
14                 match = '\\.';
15              }
16           );
17        },
18     );
19  }
The format is the property list format and at the root level there are five key/value pairs:
scopeName (line 1) — this should be a unique name for the grammar, following the convention of being a dot-separated name where each new (left-most) part specializes the name. Normally it would be a two-part name where the first is either text or source and the second is the name of the language or document type. But if you are specializing an existing type, you probably want to derive the name from the type you are specializing. For example Markdown is text.html.markdown and Ruby on Rails (rhtml files) is text.html.rails. The advantage of deriving it from (in this case) text.html is that everything which works in the text.html scope will also work in the text.html.«something» scope (but with a lower precedence than something specifically targeting text.html.«something»).
fileTypes (line 2) — this is an array of file type extensions that the grammar should (by default) be used with. This is referenced when TextMate does not know what grammar to use for a file the user opens. If however the user selects a grammar from the language pop-up in the status bar, TextMate will remember that choice.
foldingStartMarker / foldingStopMarker (line 3-4) — these are regular expressions that lines (in the document) are matched against. If a line matches one of the patterns (but not both), it becomes a folding marker (see the foldings section for more info).
patterns (line 5-18) — this is an array with the actual rules used to parse the document. In this example there are two rules (line 6-8 and 9-17). Rules will be explained in the next section.
There are two additional (root level) keys which are not used in the example:
firstLineMatch — a regular expression which is matched against the first line of the document (when it is first loaded). If it matches, the grammar is used for the document (unless there is a user override). Example: ^#!/.*\bruby\b.
repository — a dictionary (i.e. key/value pairs) of rules which can be included from other places in the grammar. The key is the name of the rule and the value is the actual rule. Further explanation (and example) follow with the description of the include rule key.
A language rule is responsible for matching a portion of the document. Generally a rule will specify a name which gets assigned to the part of the document which is matched by that rule.
There are two ways a rule can match the document. It can either provide a single regular expression, or two. As with the match key in the first rule above (lines 6-8), everything which matches that regular expression will then get the name specified by that rule. For example the first rule above assigns the name keyword.control.untitled to the following keywords: if, while, for and return. We can then use a scope selector of keyword.control to have our theme style these keywords.
The other type of match is the one used by the second rule (lines 9-17). Here two regular expressions are given using the begin and end keys. The name of the rule will be assigned from where the begin pattern matches to where the end pattern matches (including both matches). If there is no match for the end pattern, the end of the document is used.
In this latter form, the rule can have sub-rules which are matched against the part between the begin and end matches. In our example here we match strings that start and end with a quote character and escape characters are marked up as constant.character.escape.untitled inside the matched strings (line 13-15).
Note that the regular expressions are matched against only a single line of the document at a time. That means it is not possible to use a pattern that matches multiple lines. The reason for this is technical: being able to restart the parser at an arbitrary line and having to re-parse only the minimal number of lines affected by an edit. In most situations it is possible to use the begin/end model to overcome this limitation.
What follows is a list of all keys which can be used in a rule.
name — the name which gets assigned to the portion matched. This is used for styling and scope-specific settings and actions, which means it should generally be derived from one of the standard names (see naming conventions later).
match — a regular expression which is used to identify the portion of text to which the name should be assigned. Example: '\b(true|false)\b'.
begin, end — these keys allow matches which span several lines and must both be mutually exclusive with the match key. Each is a regular expression pattern. begin is the pattern that starts the block and end is the pattern which ends the block. Captures from the begin pattern can be referenced in the end pattern by using normal regular expression back-references. This is often used with here-docs, for example:
 {   name = 'string.unquoted.here-doc';
     begin = '<<(\w+)';  // match here-doc token
     end = '^\1$';       // match end of here-doc
 }
A begin/end rule can have nested patterns using the patterns key. For example we can do:
 {  begin = '<%'; end = '%>'; patterns = (
       { match = '\b(def|end)\b'; … },
       …
    );
 };
The above will match def and end keywords inside a <% … %> block (though for embedded languages see info about the include key later).
contentName — this key is similar to the name key but only assigns the name to the text between what is matched by the begin/end patterns. For example to get the text between #if 0 and #endif marked up as a comment, we would do:
 {  begin = '#if 0(\s.*)?$'; end = '#endif';
    contentName = 'comment.block.preprocessor';
 };
captures, beginCaptures, endCaptures — these keys allow you to assign attributes to the captures of the match, begin, or end patterns. Using the captures key for a begin/end rule is short-hand for giving both beginCaptures and endCaptures with same values.
The value of these keys is a dictionary with the key being the capture number and the value being a dictionary of attributes to assign to the captured text. Currently name is the only attribute supported. Here is an example:
 {  match = '(@selector\()(.*?)(\))';
    captures = {
       1 = { name = 'storage.type.objc'; };
       3 = { name = 'storage.type.objc'; };
    };
 };
In that example we match text like @selector(windowWillClose:) but the storage.type.objc name will only be assigned to @selector( and ).
include — this allows you to reference a different language, recursively reference the grammar itself or a rule declared in this file’s repository.
To reference another language, use the scope name of that language:
 {  begin = '<\?(php|=)?'; end = '\?>'; patterns = (
       { include = "source.php"; }
    );
 }
To reference the grammar itself, use $self:
 {  begin = '\('; end = '\)'; patterns = (
       { include = "$self"; }
    );
 }
To reference a rule from the current grammars repository, prefix the name with a pound sign (#):
 patterns = (
    {  begin = '"'; end = '"'; patterns = (
          { include = "#escaped-char"; },
          { include = "#variable"; }
       );
    },
    …
 ); // end of patterns
 repository = {
    escaped-char = { match = '\\.'; };
    variable =     { match = '\$[a-zA-Z0-9_]+'; };
 };
This can also be used to match recursive constructs like balanced characters:
 patterns = (
    {  name = 'string.unquoted.qq.perl';
       begin = 'qq\('; end = '\)'; patterns = (
          { include = '#qq_string_content'; },
       );
    },
    …
 ); // end of patterns
 repository = {
    qq_string_content = {
       begin = '\('; end = '\)'; patterns = (
          { include = '#qq_string_content'; },
       );
    };
 };
This will correctly match a string like: qq( this (is (the) entire) string).
TextMate is free-form in the sense that you can assign basically any name you wish to any part of the document that you can markup with the grammar system and then use that name in scope selectors.
There are however conventions so that one theme can target as many languages as possible, without having dozens of rules specific to each language and also so that functionality (mainly preferences) can be re-used across languages, e.g. you probably do not want an apostrophe to be auto-paired when inserted in strings and comments, regardless of the language you are in, so it makes sense to only set this up once.
Before going through the conventions, here are a few things to keep in mind:
A minimal theme will only assign styles to 10 of the 11 root groups below (meta does not get a visual style), so you should “spread out” your naming i.e. instead of putting everything below keyword (as your formal language definition may insist) you should think “would I want these two elements styled differently?” and if so, they should probably be put into different root groups.
Even though you should “spread out” your names, when you have found the group in which you want to place your element (e.g. storage) you should re-use the existing names used below that group (for storage that is modifier or type) rather than make up a new sub-type. You should however append as much information to the sub-type you choose. For example if you are matching the static storage modifier, then instead of just naming it storage.modifier use storage.modifier.static.«language». A scope selector of just storage.modifier will match both, but having the extra information in the name means it is possible to specifically target it disregarding the other storage modifiers.
Put the language name last in the name. This may seem redundant, since you can generally use a scope selector of: source.«language» storage.modifier, but when embedding languages, this is not always possible.
And now the 11 root groups which are currently in use with some explanation about their intended purpose. This is presented as a hierarchical list but the actual scope name is obtained by joining the name from each level with a dot. For example double-slash is comment.line.double-slash.
comment — for comments.
line — line comments, we specialize further so that the type of comment start character(s) can be extracted from the scope.
double-slash — // commentdouble-dash — -- commentnumber-sign — # commentpercentage — % commentblock — multi-line comments like /* … */ and <!-- … -->.
documentation — embedded documentation.constant — various forms of constants.
numeric — those which represent numbers, e.g. 42, 1.3f, 0x4AB1U.character — those which represent characters, e.g. <, \e, \031.
escape — escape sequences like \e would be constant.character.escape.language — constants (generally) provided by the language which are “special” like true, false, nil, YES, NO, etc.other — other constants, e.g. colors in CSS.entity — an entity refers to a larger part of the document, for example a chapter, class, function, or tag. We do not scope the entire entity as entity.* (we use meta.* for that). But we do use entity.* for the “placeholders” in the larger entity, e.g. if the entity is a chapter, we would use entity.name.section for the chapter title.
name — we are naming the larger entity.
function — the name of a function.type — the name of a type declaration or class.tag — a tag name.section — the name is the name of a section/heading.other — other entities.
inherited-class — the superclass/baseclass name.attribute-name — the name of an attribute (mainly in tags).invalid — stuff which is “invalid”.
illegal — illegal, e.g. an ampersand or lower-than character in HTML (which is not part of an entity/tag).deprecated — for deprecated stuff e.g. using an API function which is deprecated or using styling with strict HTML.keyword — keywords (when these do not fall into the other groups).
control — mainly related to flow control like continue, while, return, etc.operator — operators can either be textual (e.g. or) or be characters.other — other keywords.markup — this is for markup languages and generally applies to larger subsets of the text.
underline — underlined text.
link — this is for links, as a convenience this is derived from markup.underline so that if there is no theme rule which specifically targets markup.underline.link then it will inherit the underline style.bold — bold text (text which is strong and similar should preferably be derived from this name).heading — a section header. Optionally provide the heading level as the next element, for example markup.heading.2.html for <h2>…</h2> in HTML.italic — italic text (text which is emphasized and similar should preferably be derived from this name).list — list items.
numbered — numbered list items.unnumbered — unnumbered list items.quote — quoted (sometimes block quoted) text.raw — text which is verbatim, e.g. code listings. Normally spell checking is disabled for markup.raw.other — other markup constructs.meta — the meta scope is generally used to markup larger parts of the document. For example the entire line which declares a function would be meta.function and the subsets would be storage.type, entity.name.function, variable.parameter etc. and only the latter would be styled. Sometimes the meta part of the scope will be used only to limit the more general element that is styled, most of the time meta scopes are however used in scope selectors for activation of bundle items. For example in Objective-C there is a meta scope for the interface declaration of a class and the implementation, allowing the same tab-triggers to expand differently, depending on context.
storage — things relating to “storage”.
type — the type of something, class, function, int, var, etc.modifier — a storage modifier like static, final, abstract, etc.string — strings.
quoted — quoted strings.
single — single quoted strings: 'foo'.double — double quoted strings: "foo".triple — triple quoted strings: """Python""".other — other types of quoting: $'shell', %s{...}.unquoted — for things like here-docs and here-strings.interpolated — strings which are “evaluated”: `date`, $(pwd).regexp — regular expressions: /(\w+)/.other — other types of strings (should rarely be used).support — things provided by a framework or library should be below support.
function — functions provided by the framework/library. For example NSLog in Objective-C is support.function.class — when the framework/library provides classes.type — types provided by the framework/library, this is probably only used for languages derived from C, which has typedef (and struct). Most other languages would introduce new types as classes.constant — constants (magic values) provided by the framework/library.variable — variables provided by the framework/library. For example NSApp in AppKit.other — the above should be exhaustive, but for everything else use support.other.variable — variables. Not all languages allow easy identification (and thus markup) of these.
parameter — when the variable is declared as the parameter.language — reserved language variables like this, super, self, etc.other — other variables, like $some_variables.A scope selector is a pattern much like a CSS selector which is matched against the scope of the caret (i.e. current context) and the outcome is either a match or a non-match (see also: ranking matches further down).

This allows the activation method of a bundle item to be limited to contexts like “inside a comment” or “in an HTML document”. The advantage of this is that it allows a tab trigger like for to be re-used in different languages and works smoothly for mixed documents like HTML which can have embedded CSS, PHP, Ruby and JavaScript.
Scope selectors are also used with preference items and themes. In the latter case they are used to style elements of a document and in the former case to adjust various aspects of editing etc. on a granular basis.
Generally a document consists of many different elements. A prose document may contain headings, paragraphs, bullet lists, emphasized text where source code will often contain strings, comments, keywords, storage types etc.
In TextMate the language grammars will match these elements and assign a name to each. This name should be dot separated with each additional part specializing the kind of element matched. For example a double-quoted string in C will get string.quoted.double.c assigned as its scope name (see naming conventions for more info).
A scope selector in its simplest form is an element name to match, but it only needs to specify a prefix of the actual element name. So if we specify string as our scope selector it will also match all quoted strings. Likewise if we specify string.quoted it will match single, double and triple quoted strings.
An empty scope selector will match all scopes but with the lowest possible rank (see ranking matches later).
As with CSS, it is possible to use the context of an element in the scope selector. The picture below shows the scope for the string as a tool tip (via ⌃⇧P). The direct parent of the string is source.php.embedded.html and text.html.basic is an ancestor.
In the scope selector we specify element names as a space separated list to indicate that each element should be present in the scope (and in the same order). So if we want to target all strings in PHP, we can use source.php string, or we can use text.html source.php to target PHP embedded in HTML.
There are situations where we want to match a subset of a document but exclude particular subsets of this subset.
For example in Ruby it is possible to embed code in strings using #{…}, so a nice snippet would be to insert that when pressing # inside of a string. The scope selector for that would be: source.ruby string.
This unfortunately means that even inside code (embedded in strings) # will insert #{…}. To avoid this, we can subtract scope selectors to get the (asymmetric) difference using the minus operator. So a better scope selector for our snippet would be source.ruby string - string source.
Below is an illustration of what that scope selector would target.
puts "Today is #{Date.today}."
     ^^^^^^^^^^             ^^
When we want something to match several distinct scopes, we can group scope selectors with the comma operator. For example to match both strings and comments the scope selector would be: string, comment.
If more than one scope selector matches the current scope then they are ranked according to how “good” a match they each are.
The winner is the scope selector which (in order of precedence):
Match the element deepest down in the scope e.g. string wins over source.php when the scope is source.php string.quoted.
Match most of the deepest element e.g. string.quoted wins over string.
Rules 1 and 2 applied again to the scope selector when removing the deepest element (in the case of a tie), e.g. text source string wins over source string.
In the case of tab triggers, key equivalents and dropped files (drag commands), a menu is presented for the best matches when these are identical in rank (which would mean the scope selector in that case was identical).
For themes and preference items, the winner is undefined when multiple items use the same scope selector, though this is on a per-property basis. So for example if one theme item sets the background to blue for string.quoted and another theme item sets the foreground to white, again for string.quoted, the result would be that the foreground was taken from the latter item and background from the former.
TextMate uses language grammars to assign names to document elements such as strings, comments, keywords and similar. It is possible to specify particular elements using scope selectors in the same way that you can use CSS selectors to select HTML elements.
Styling a document in TextMate is similar to creating a style sheet for an HTML document. The process happens in Preferences → Fonts & Colors where one can select a theme (analogous to a style sheet), edit one of the themes or create new themes.

Changing theme is global i.e. it is currently not possible to select a specific theme per file or file type.
A theme has six standard properties, these are the background, foreground, caret, selection, invisibles and line highlight color. In addition to that the theme consists of a list of “theme items”. Each of these items has a scope selector to select what element(s) the item should apply to and then optionally a foreground and background color and a font style (bold, italic and underline).
![]()
If a theme item currently has no foreground or background color, you can click the FG or BG column to add one. If instead you want to remove it, drag away the color well shown in the FG or BG column until the disappearing mouse pointer shows and then release the mouse to have the color removed.
Remember that scope selectors can be complex, so it is possible to set the background for text.html source.ruby so that Ruby blocks in HTML gets a particular color for example or use string - string source to style only the part of a string which is not embedded code.
The TextMate wiki has a page for custom themes where users are encouraged to share their themes.
For settings where differing values are useful to have based on a file type or the context of the caret position in a document, the bundle editor allows you to set and specify a scope selector which selects which scope the particular settings should apply.
Currently the preferences are specified in the old-style property list format.
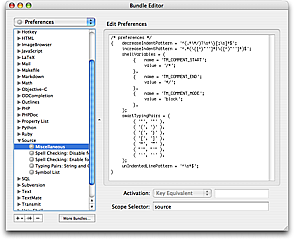
completions — an array of additional candidates when cycling through completion candidates from the current document.completionCommand — a shell command (string) which should return a list of candidates to complete the current word (obtained via the TM_CURRENT_WORD variable).disableDefaultCompletion — set to 1 if you want to exclude matches from the current document when asking for completion candidates (useful when you provide your own completion command).For more info see section on completions.
decreaseIndentPattern — regular expression.increaseIndentPattern — regular expression.indentNextLinePattern — regular expression.unIndentedLinePattern — regular expression.For more information see indentation rules.
showInSymbolList — set to 1 to include in the symbol list.symbolTransformation — a “program” consisting of one or more s/«regexp»/«format»/«options»; transformations which will be applied to the extracted “symbol”.For more information see customizing the symbol list.
highlightPairs — an array of arrays, each containing a pair of characters where, when the caret moves over the second, the first one will be highlighted for a short moment, if found.smartTypingPairs — an array of arrays, each containing a pair of characters where when the first is typed, the second will be inserted. An example is shown below. For more information see auto-paired characters.
 smartTypingPairs = (
     ( '"', '"' ),
     ( '(', ')' ),
     ( '{', '}' ),
     ( '[', ']' ),
     ( '“', '”' ),
     ( "'", "'" ),
     ( '`', '`' ),
 );
shellVariables — an array of key/value pairs. See context dependent variables.spellChecking — set to 0/1 to disable/enable spell checking.There are basically three types of actions in TextMate and each has its own system when it comes to key bindings (yes, this is not ideal).
Bundle items are commands, snippets, macros, language grammars, templates etc. and can all be found in the bundle editor (Window → Show Bundle Editor). Each of these actions has a key equivalent and an associated scope selector which can be edited from the bundle editor.
Menu items can be edited via System Preferences → Keyboard & Mouse. From here it is possible to change key bindings for either all applications or particular applications based on the menu items title.
This is done by pressing the plus button on the left side below the list on the Keyboard Shortcuts page, which displays the sheet shown below.
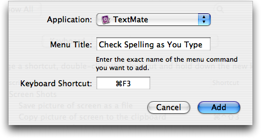
Some caveats:
Only key bindings which include the command modifier (⌘) will work.
Dynamic menu items i.e. those which change title depending on the programs state (like Fold Current Block / Selection) should be specified with their initial title. The initial title can be found by opening the MainMenu.nib file in Interface Builder (use Show Package Contents on TextMate and navigate to Contents → Resources → English.lproj).
You need to restart an application before key binding changes take effect.
An alternative to the system preferences is Menu Master from Unsanity. This allows you to change the key binding inside the application simply by hovering your mouse on the item and pressing the new key (and does not require a restart).
The last is probably the most essential, it is the keys which “just work” in the actual text editing area.
Here TextMate uses the Cocoa key bindings system where the master set of keys are defined in /System/Library/Frameworks/AppKit.framework/Resources/StandardKeyBinding.dict and used by all Cocoa text fields and to some degree other controls also.
The master set of keys can be augmented by ~/Library/KeyBindings/DefaultKeyBinding.dict. The most common request with respect to key bindings is to have page up/down move the caret and have home/end go to the beginning and end of the line. This article shows how this can be done.
In addition TextMate has a /path/to/TextMate.app/Contents/Resources/KeyBindings.dict file with some extra key bindings which are specific to TextMate (and thus not appropriate to put in the per user global key bindings file). You can copy this file to ~/Library/Application Support/TextMate and edit it, this will then take precedence over the bundled file.
The format is explained in the blog post linked to above.
For a list of which keys are available by default (in OS X) please see this list of key bindings created by Jacob Rus.
Apple also has a page about standard key bindings as part of their human Interface Guidelines. TextMate conforms to these and implement majority of the keys shown on that page.
In addition TextMate has the following key bindings, which are not visible in the menus and cannot be found in the standard key binding files:
| Key | Action |
|---|---|
⌥F2 |
Show context menu — This is equivalent to clicking the mouse at the current caret location while holding down control (⌃). If the current word is misspelled the context menu will contain spelling suggestions. |
⌃⎋ |
Show bundle items menu — this opens the gear menu which is located in the status bar. |
⌃S |
Forward incremental search. |
⌃⇧S |
Backward incremental search. |
⌘` |
Switch to the next/previous window. This keyboard shortcut is based on the physical location of the key so on many European keymaps it is instead ⌘< and ⌘> (it is the key to the left of the Z). |
⌥⌘` |
Switch between main window and drawer. Like the previous key this one is also based on physical location. The function is not available on Panther. |
⌃⇥ |
Go backwards through the chain of keyboard accessible controls. Normally this would be the same as ⇤ (⇧⇥) but that one doesn’t work when the text editing control has focus. The previous keyboard accessible control in that situation is the project outline in the drawer, so this key could be considered a “bring focus to the project drawer” key. |
| Modifiers | Purpose |
|---|---|
| ⌘ | This is for primary actions mostly defined by Apple or already a de-facto standard e.g. New, Open, Save, Print, Hide, Quit, Cut, Copy, Paste, etc. |
| ⇧⌘ | Adding the shift modifier often indicates a twist on the plain key equivalent. For example
|
| ⌥⌘ | Often (but definitely not always) this modifier sequence is used to toggle an option, e.g. Soft Wrap (⌥⌘W), Show Invisibles (⌥⌘I), Bookmarks (⌥⌘B), Line Numbers (⌥⌘L), Foldings at a given level (⌥⌘0-9) etc. |
| ⌃⌥⌘ | This modifier sequence is generally used for actions which open a window. For example Show Bundle Editor (⌃⌥⌘B), Show Clipboard History (⌃⌥⌘V), Show/Hide Project Drawer (⌃⌥⌘D), Show Web Preview (⌃⌥⌘P) etc. |
| ⌃⇧ | Less important bundle actions (commands and sometimes snippets) should generally use this modifier sequence. |
| ⌃⇧⌘ | This is the secondary modifier sequence for use with less important bundle actions (i.e. when the primary one is taken). |
| ⌃⌥⇧ | This is used to switch language grammar, the key is (generally) the first letter of the language grammar name. |
| ⌃⌘ | Actions related to projects are in this space, e.g. New Project, Save Project, Reveal in Project, etc. |
A template consists of a (shell) command which generates a new file based on the template’s contents. Below is shown how an index.html file is part of the XHTML 1.1 template.
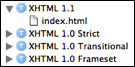
When executing the template shell command, the working directory is set to the directory containing the template files so that these can be referenced by name only (i.e. without path) and the shell command has access to the following three environment variables (in addition to the normal variables):
TM_NEW_FILE — the full path, including the name of the file to be generated (i.e. the one the user entered in the GUI).
TM_NEW_FILE_BASENAME — the base name of the file to be generated. If TM_NEW_FILE is /tmp/foo.txt then this variable would be foo without the folder name and the file extension.
TM_NEW_FILE_DIRECTORY — the folder name of the file to be generated.
A template can then be instantiated either by using the menus (File → New From Template) or for projects by using the New File button in the project drawer (⇧⌘N).
To the amusement of some and the frustration of others, TextMate currently features only limited printing capabilities.
That means you can only use the document font with no syntax highlighting and no options except the standard printing options plus header and footer fields as shown below.
The header and footer fields support the normal variables, interpolated code using backticks and in addition has access to these two variables:
TM_PAGE — the current page being printed (this is the actual page number as if all pages in the document are printed, so even if you only print page 3, this variable will be 3 and not 1).
TM_PAGES — total number of pages in the document.
There are plans to improve the printing capabilities, but until then, there is also a command in the Source bundle (View Source as PDF) which produces a PDF from the current source using enscript and has syntax highlighting enabled for supported languages.
TextMate has a few options in the advanced preferences which affect how to save files.
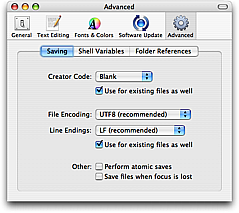
Atomic saves mean that instead of overwriting the file, TextMate saves to a new file and once this succeeds, overwrites the old file. This has the advantage that if your machine should crash while saving a file, you do not run the risk of losing the contents of both the old (last-saved) and new files.
The downside is that since a new file is actually written to disk (with a new inode), you may break an alias to the file, although this happens only if you also moved the file, or will move it, since path has precedence over inodes when resolving aliases. Also, the Finder will reposition the icon of the file each time you save it (which is only a problem if the file is in a folder you keep in sight).
The creator code is how Classic Macs associated a file with its application. On OS X the association is mainly through the file extension, which has the advantage that if you one day get a better program (!) to handle a given file type, you only need to update the association in one place, instead of changing the creator code of all your saved files. For this reason the recommendation is to not set this or set it to Blank.
TextMate is heavily biased toward UTF-8. UTF-8 is an ASCII compatible encoding, so using it should give no problems with existing tools such as grep, diff, ruby (the interpreter), gcc (the compiler) etc.
Since the file system uses UTF-8 for filenames, Terminal is set to UTF-8 by default (to have the result from e.g. ls show correctly). This means that if you cat a non-ASCII file in Terminal or run a script which outputs more than ASCII (e.g. uses ellipsis or curly quotes), it will only show correctly if the output is UTF-8 (unless you change Terminal’s encoding).
In addition, UTF-8 is the only encoding that can represent all the characters you can type on your Mac. Even things like the euro symbol (€) will give a problem with the older (legacy) encodings.
And as an extra bonus, UTF-8 is the only 8 bit encoding which is recognizable with a near 100% certainty, which means that as long as you use UTF-8, you should no longer experience opening a file and the text editor making a wrong guess about the encoding used (which can mess up the file if you then save it without noticing it).
A final argument for UTF-8 is that TextMate is only providing the infrastructure for a lot of functionality. All this functionality is written as scripts and these work with the current document, files in your project, the selection etc. An action might be to transform text, show a result as HTML in a new document etc. In almost all these situations, having to deal with encoding is impractical and sometimes not even possible (like if the result can not be represented using the encoding of the source), so for all this stuff, UTF-8 is assumed.
There is a post on the TextMate blog about how to handle UTF-8 in miscellaneous situations (POST’ing data to a web-server, setting the encoding for LaTeX documents, etc.).
Having said all that, it is possible to change the default encoding and if you only need to save out a single file with another encoding you can adjust that in the Save As… dialog. The list of encodings is short and it is intentionally that way. If you need to use other encodings, the current advice is to use iconv.
You can run iconv -l for a list of the hundreds of encodings it supports.
To convert a set of files to UTF-8 in the terminal, you can run something like this:
for f in *.txt; do iconv -f mac -t utf-8 "$f" >"$f.utf8"; done
Starting with Tiger, OS X supports setxattr and friends.
TextMate makes use of extended attributes to store the carets position, bookmarks, what text is folded and is likely to make further use of extended attributes in the future.
For filesystems which do not natively support extended attributes (like network mounted disks), OS X instead stores the extra information in a file named ._«filename», where «filename» is the name of the original file.
Since not all users think that this extra (hidden) file is worth having in order for TextMate to remember state, it is possible to disable the use of extended attributes by quitting TextMate and running the following from the shell:
defaults write com.macromates.textmate OakDocumentDisableFSMetaData 1
If you are working with a project where you test your work by switching to another application (e.g. Terminal or a browser) you can set TextMate to save all modified files, when the focus is lost. That way, when you switch to the other application, TextMate will automatically save all your changes.
A regular expression is a domain specific language for matching text. Naively we could write a small program to match text, but this is error-prone, tedious and not very portable or flexible.
Instead we use regular expressions which describe the match as a string which (in a simple case) consists of the character types to match and quantifiers for how many times we want to have the character type matched.
For example normal letters and digits match literally. Something like \w will match word characters, where \s will match whitespace characters (space, tab, newline, etc.). The period (.) will match any character (except newline).
The basic quantifiers are the asterisk (*) to specify that the match should happen zero or more times, plus (+) for one or more times, or a range can be given as {min,max}.
This alone gives us capabilities like finding words (\w+) or finding an image tag with an alt argument (<img.*alt=".*">).
Matching longer text sequences is one thing, but often we are interested in the subset of the match. For example, in the above example we may want to replace the alt argument text. If we enclose part of the regular expression with parentheses, we capture that part in a variable that can be used in the replacement string. The format of the replacement string is described at the end of this section, but to refer to the first capture, we use $1, $2 for the second etc.
So to change the alt argument text we could search for (<img.*alt=").*(">) and replace that with $1Text Intentionally Removed$2.
Note that in the examples above .* is used. The asterisk operator is however greedy, meaning that it will match as many characters as possible (which still allow a match to occur), so often we want to change it to non-greedy by adding ?, making it .*?.
Here is a list of places where TextMate makes use of regular expressions:
So needless to say, these play a big role in TextMate. While you can live a happy life without knowing about them, it is strongly recommended that you do pick up a book, tutorial or similar to get better acquainted with these (if you are not already).
In addition to TextMate, many common shell commands support regular expressions (sed, grep, awk, find) and popular scripting languages like Perl and Ruby have regular expressions ingrained deep into the language.
TextMate uses the Oniguruma regular expression library by K. Kosako.
The following is taken from http://www.geocities.jp/kosako3/oniguruma/doc/RE.txt.
Oniguruma Regular Expressions Version 5.6.0    2007/04/03

syntax: ONIG_SYNTAX_RUBY (default)


1. Syntax elements

  \       escape (enable or disable meta character meaning)
  |       alternation
  (...)   group
  [...]   character class


2. Characters

  \t           horizontal tab (0x09)
  \v           vertical tab   (0x0B)
  \n           newline        (0x0A)
  \r           return         (0x0D)
  \b           back space     (0x08)
  \f           form feed      (0x0C)
  \a           bell           (0x07)
  \e           escape         (0x1B)
  \nnn         octal char            (encoded byte value)
  \xHH         hexadecimal char      (encoded byte value)
  \x{7HHHHHHH} wide hexadecimal char (character code point value)
  \cx          control char          (character code point value)
  \C-x         control char          (character code point value)
  \M-x         meta  (x|0x80)        (character code point value)
  \M-\C-x      meta control char     (character code point value)

 (* \b is effective in character class [...] only)


3. Character types

  .        any character (except newline)

  \w       word character

           Not Unicode:
             alphanumeric, "_" and multibyte char.

           Unicode:
             General_Category -- (Letter|Mark|Number|Connector_Punctuation)

  \W       non word char

  \s       whitespace char

           Not Unicode:
             \t, \n, \v, \f, \r, \x20

           Unicode:
             0009, 000A, 000B, 000C, 000D, 0085(NEL),
             General_Category -- Line_Separator
                              -- Paragraph_Separator
                              -- Space_Separator

  \S       non whitespace char

  \d       decimal digit char

           Unicode: General_Category -- Decimal_Number

  \D       non decimal digit char

  \h       hexadecimal digit char   [0-9a-fA-F]

  \H       non hexadecimal digit char


  Character Property

    * \p{property-name}
    * \p{^property-name}    (negative)
    * \P{property-name}     (negative)

    property-name:

     + works on all encodings
       Alnum, Alpha, Blank, Cntrl, Digit, Graph, Lower,
       Print, Punct, Space, Upper, XDigit, Word, ASCII,

     + works on EUC_JP, Shift_JIS
       Hiragana, Katakana

     + works on UTF8, UTF16, UTF32
       Any, Assigned, C, Cc, Cf, Cn, Co, Cs, L, Ll, Lm, Lo, Lt, Lu,
       M, Mc, Me, Mn, N, Nd, Nl, No, P, Pc, Pd, Pe, Pf, Pi, Po, Ps,
       S, Sc, Sk, Sm, So, Z, Zl, Zp, Zs,
       Arabic, Armenian, Bengali, Bopomofo, Braille, Buginese,
       Buhid, Canadian_Aboriginal, Cherokee, Common, Coptic,
       Cypriot, Cyrillic, Deseret, Devanagari, Ethiopic, Georgian,
       Glagolitic, Gothic, Greek, Gujarati, Gurmukhi, Han, Hangul,
       Hanunoo, Hebrew, Hiragana, Inherited, Kannada, Katakana,
       Kharoshthi, Khmer, Lao, Latin, Limbu, Linear_B, Malayalam,
       Mongolian, Myanmar, New_Tai_Lue, Ogham, Old_Italic, Old_Persian,
       Oriya, Osmanya, Runic, Shavian, Sinhala, Syloti_Nagri, Syriac,
       Tagalog, Tagbanwa, Tai_Le, Tamil, Telugu, Thaana, Thai, Tibetan,
       Tifinagh, Ugaritic, Yi


4. Quantifier

  greedy

    ?       1 or 0 times
    *       0 or more times
    +       1 or more times
    {n,m}   at least n but not more than m times
    {n,}    at least n times
    {,n}    at least 0 but not more than n times ({0,n})
    {n}     n times

  reluctant

    ??      1 or 0 times
    *?      0 or more times
    +?      1 or more times
    {n,m}?  at least n but not more than m times
    {n,}?   at least n times
    {,n}?   at least 0 but not more than n times (== {0,n}?)

  possessive (greedy and does not backtrack after repeated)

    ?+      1 or 0 times
    *+      0 or more times
    ++      1 or more times

    ({n,m}+, {n,}+, {n}+ are possessive op. in ONIG_SYNTAX_JAVA only)

    ex. /a*+/ === /(?>a*)/


5. Anchors

  ^       beginning of the line
  $       end of the line
  \b      word boundary
  \B      not word boundary
  \A      beginning of string
  \Z      end of string, or before newline at the end
  \z      end of string
  \G      matching start position


6. Character class

  ^...    negative class (lowest precedence operator)
  x-y     range from x to y
  [...]   set (character class in character class)
  ..&&..  intersection (low precedence at the next of ^)

    ex. [a-w&&[^c-g]z] ==> ([a-w] AND ([^c-g] OR z)) ==> [abh-w]

  * If you want to use '[', '-', ']' as a normal character
    in a character class, you should escape these characters by '\'.


  POSIX bracket ([:xxxxx:], negate [:^xxxxx:])

    Not Unicode Case:

      alnum    alphabet or digit char
      alpha    alphabet
      ascii    code value: [0 - 127]
      blank    \t, \x20
      cntrl
      digit    0-9
      graph    include all of multibyte encoded characters
      lower
      print    include all of multibyte encoded characters
      punct
      space    \t, \n, \v, \f, \r, \x20
      upper
      xdigit   0-9, a-f, A-F
      word     alphanumeric, "_" and multibyte characters


    Unicode Case:

      alnum    Letter | Mark | Decimal_Number
      alpha    Letter | Mark
      ascii    0000 - 007F
      blank    Space_Separator | 0009
      cntrl    Control | Format | Unassigned | Private_Use | Surrogate
      digit    Decimal_Number
      graph    [[:^space:]] && ^Control && ^Unassigned && ^Surrogate
      lower    Lowercase_Letter
      print    [[:graph:]] | [[:space:]]
      punct    Connector_Punctuation | Dash_Punctuation | Close_Punctuation |
               Final_Punctuation | Initial_Punctuation | Other_Punctuation |
               Open_Punctuation
      space    Space_Separator | Line_Separator | Paragraph_Separator |
               0009 | 000A | 000B | 000C | 000D | 0085
      upper    Uppercase_Letter
      xdigit   0030 - 0039 | 0041 - 0046 | 0061 - 0066
               (0-9, a-f, A-F)
      word     Letter | Mark | Decimal_Number | Connector_Punctuation


7. Extended groups

  (?#...)            comment

  (?imx-imx)         option on/off
                         i: ignore case
                         m: multi-line (dot(.) match newline)
                         x: extended form
  (?imx-imx:subexp)  option on/off for subexp

  (?:subexp)         not captured group
  (subexp)           captured group

  (?=subexp)         look-ahead
  (?!subexp)         negative look-ahead
  (?<=subexp)        look-behind
  (?<!subexp)        negative look-behind

                     Subexp of look-behind must be fixed character length.
                     But different character length is allowed in top level
                     alternatives only.
                     ex. (?<=a|bc) is OK. (?<=aaa(?:b|cd)) is not allowed.

                     In negative-look-behind, captured group isn't allowed,
                     but shy group(?:) is allowed.

  (?>subexp)         atomic group
                     don't backtrack in subexp.

  (?<name>subexp), (?'name'subexp)
                     define named group
                     (All characters of the name must be a word character.)

                     Not only a name but a number is assigned like a captured
                     group.

                     Assigning the same name as two or more subexps is allowed.
                     In this case, a subexp call can not be performed although
                     the back reference is possible.


8. Back reference

  \n          back reference by group number (n >= 1)
  \k<name>    back reference by group name
  \k'name'    back reference by group name

  In the back reference by the multiplex definition name,
  a subexp with a large number is referred to preferentially.
  (When not matched, a group of the small number is referred to.)

  * Back reference by group number is forbidden if named group is defined
    in the pattern and ONIG_OPTION_CAPTURE_GROUP is not setted.


  back reference with nest level

    \k<name+n>     n: 0, 1, 2, ...
    \k<name-n>     n: 0, 1, 2, ...
    \k'name+n'     n: 0, 1, 2, ...
    \k'name-n'     n: 0, 1, 2, ...

    Destinate relative nest level from back reference position.

    ex 1.

      /\A(?<a>|.|(?:(?<b>.)\g<a>\k<b+0>))\z/.match("reer")

    ex 2.

      r = Regexp.compile(<<'__REGEXP__'.strip, Regexp::EXTENDED)
      (?<element> \g<stag> \g<content>* \g<etag> ){0}
      (?<stag> < \g<name> \s* > ){0}
      (?<name> [a-zA-Z_:]+ ){0}
      (?<content> [^<&]+ (\g<element> | [^<&]+)* ){0}
      (?<etag> </ \k<name+1> >){0}
      \g<element>
      __REGEXP__

      p r.match('<foo>f<bar>bbb</bar>f</foo>').captures


9. Subexp call ("Tanaka Akira special")

  \g<name>    call by group name
  \g'name'    call by group name
  \g<n>       call by group number (n >= 1)
  \g'n'       call by group number (n >= 1)

  * left-most recursive call is not allowed.
     ex. (?<name>a|\g<name>b)   => error
         (?<name>a|b\g<name>c)  => OK

  * Call by group number is forbidden if named group is defined in the pattern
    and ONIG_OPTION_CAPTURE_GROUP is not setted.

  * If the option status of called group is different from calling position
    then the group's option is effective.

    ex. (?-i:\g<name>)(?i:(?<name>a)){0}  match to "A"


10. Captured group

  Behavior of the no-named group (...) changes with the following conditions.
  (But named group is not changed.)

  case 1. /.../     (named group is not used, no option)

     (...) is treated as a captured group.

  case 2. /.../g    (named group is not used, 'g' option)

     (...) is treated as a no-captured group (?:...).

  case 3. /..(?<name>..)../   (named group is used, no option)

     (...) is treated as a no-captured group (?:...).
     numbered-backref/call is not allowed.

  case 4. /..(?<name>..)../G  (named group is used, 'G' option)

     (...) is treated as a captured group.
     numbered-backref/call is allowed.

  where
    g: ONIG_OPTION_DONT_CAPTURE_GROUP
    G: ONIG_OPTION_CAPTURE_GROUP

  ('g' and 'G' options are argued in ruby-dev ML)


-----------------------------
A-1. Syntax depend options

   + ONIG_SYNTAX_RUBY
     (?m): dot(.) match newline

   + ONIG_SYNTAX_PERL and ONIG_SYNTAX_JAVA
     (?s): dot(.) match newline
     (?m): ^ match after newline, $ match before newline


A-2. Original extensions

   + hexadecimal digit char type  \h, \H
   + named group                  (?<name>...), (?'name'...)
   + named backref                \k<name>
   + subexp call                  \g<name>, \g<group-num>


A-3. Lacked features compare with perl 5.8.0

   + \N{name}
   + \l,\u,\L,\U, \X, \C
   + (?{code})
   + (??{code})
   + (?(condition)yes-pat|no-pat)

   * \Q...\E
     This is effective on ONIG_SYNTAX_PERL and ONIG_SYNTAX_JAVA.


A-4. Differences with Japanized GNU regex(version 0.12) of Ruby 1.8

   + add character property (\p{property}, \P{property})
   + add hexadecimal digit char type (\h, \H)
   + add look-behind
     (?<=fixed-char-length-pattern), (?<!fixed-char-length-pattern)
   + add possessive quantifier. ?+, *+, ++
   + add operations in character class. [], &&
     ('[' must be escaped as an usual char in character class.)
   + add named group and subexp call.
   + octal or hexadecimal number sequence can be treated as
     a multibyte code char in character class if multibyte encoding
     is specified.
     (ex. [\xa1\xa2], [\xa1\xa7-\xa4\xa1])
   + allow the range of single byte char and multibyte char in character
     class.
     ex. /[a-<<any EUC-JP character>>]/ in EUC-JP encoding.
   + effect range of isolated option is to next ')'.
     ex. (?:(?i)a|b) is interpreted as (?:(?i:a|b)), not (?:(?i:a)|b).
   + isolated option is not transparent to previous pattern.
     ex. a(?i)* is a syntax error pattern.
   + allowed incompleted left brace as an usual string.
     ex. /{/, /({)/, /a{2,3/ etc...
   + negative POSIX bracket [:^xxxx:] is supported.
   + POSIX bracket [:ascii:] is added.
   + repeat of look-ahead is not allowed.
     ex. /(?=a)*/, /(?!b){5}/
   + Ignore case option is effective to numbered character.
     ex. /\x61/i =~ "A"
   + In the range quantifier, the number of the minimum is omissible.
     /a{,n}/ == /a{0,n}/
     The simultanious abbreviation of the number of times of the minimum
     and the maximum is not allowed. (/a{,}/)
   + /a{n}?/ is not a non-greedy operator.
     /a{n}?/ == /(?:a{n})?/
   + invalid back reference is checked and cause error.
     /\1/, /(a)\2/
   + Zero-length match in infinite repeat stops the repeat,
     then changes of the capture group status are checked as stop condition.
     /(?:()|())*\1\2/ =~ ""
     /(?:\1a|())*/ =~ "a"


A-5. Disabled functions by default syntax

   + capture history

     (?@...) and (?@<name>...)

     ex. /(?@a)*/.match("aaa") ==> [<0-1>, <1-2>, <2-3>]

     see sample/listcap.c file.


A-6. Problems

   + Invalid encoding byte sequence is not checked in UTF-8.

     * Invalid first byte is treated as a character.
       /./u =~ "\xa3"

     * Incomplete byte sequence is not checked.
       /\w+/ =~ "a\xf3\x8ec"

// END
When you perform a regular expression replace, the replace string is interpreted as a format string which can reference captures, perform case foldings, do conditional insertions (based on capture registers) and support a minimal amount of escape sequences.
To reference a capture, use $n where n is the capture register number. Using $0 means the entire match.
Example:
   Find: <img src="(.*?)">
Replace: <img src="$1" alt="$1">
It is possible to convert the next character to upper or lowercase by prepending it with \u or \l. This is mainly useful when the next character stems from a capture register. Example:
   Find: (<a.*?>)(.*?)(</a>)
Replace: $1\u$2$3
You can also convert a longer sequence to upper or lowercase by using \U or \L and then \E to disable the case folding again. Example:
   Find: (<a.*?>)(.*?)(</a>)
Replace: $1\U$2\E$3
There are times where the replacements depends on whether or not something was matched. This can be done using (?«n»:«insertion») to insert «insertion» if capture «n» was matched. You can also use (?«n»:«insertion»:«otherwise») to have «otherwise» inserted when capture «n» was not matched.
To make a capture conditional either place it in an alternation, e.g. foo|(bar)|fud or append a question mark to it: (bar)?. Note that (.*) will result in a match, even when zero characters are matched, so use (.+)? instead.
So for example if we wish to truncate text to eight words and insert ellipsis only if there were more than eight words, we can use:
   Find: (\w+(?:\W+\w+){,7})\W*(.+)?
Replace: $1(?2:…)
Here we first match a word (\w+) followed by up to seven words ((?:\W+\w+){,7}) each preceded by non-word characters (spacing). Then optionally put anything following that (separated by non-word characters) into capture register 2 ((.+)?).
The replacement first inserts the (up to) eight words matched ($1) and then only if capture 2 matched something, ellipsis ((?2:…)).
In addition to the case folding escape codes, you can insert a newline character with \n, a tab character with \t and a dollar sign with \$.
Mac OS X comes with an open shell command which can be used to simulate a double click from within Terminal. It can also perform an Open With… operation by use of the -a argument, e.g.: open -a TextMate . will open the current folder in TextMate (as a scratch project).
This standard command has a few shortcomings: it can only open one file at a time, it cannot open a document at a specific line and it cannot “stall” the shell until the file has been closed, which is useful e.g. when using an editor to write something like a subversion commit message.
For this reason TextMate comes with its own mate shell command, which supersedes the open command. For usage instructions you can run mate -h (from Terminal).
The mate command is located inside the TextMate application bundle and it is recommended that you create a symbolic link which points to the command (rather than “install” it), so that if the command is updated in the future, you will not need to reinstall the updated command.
Creating a symbolic link can either be done by selecting Help → Terminal Usage… from the menu, or from the shell by running something like the following:
ln -s /Applications/TextMate.app/Contents/Resources/mate ~/bin/mate
This assumes that you have ~/bin created and in your path and that TextMate is installed in /Applications.
After having created this link, you may want to setup a few shell variables to make other applications use TextMate as an external editor.
The EDITOR variable is used by many shell commands, like svn (subversion) and CVS. To use TextMate as the editor for the EDITOR variable, set it like this (for bash and zsh users e.g. in ~/.bash_profile or ~/.zshrc):
export EDITOR='mate -w'
We add the -w argument to make the command wait for TextMate to close the file, before continuing.
There is one command which does not support giving arguments in the EDITOR variable, it is crontab (which is sort of obsoleted by launchd). If you need to use it, you can create a symbolic link to mate with a _wait suffix which implies -w. For example:
ln -s mate ~/bin/mate_wait   # run this once to create the link
export EDITOR='mate_wait'    # use in your ~/.bash_profile
When you commit to a Git repository you may find that your caret is not at the first line.
This is because Git reuses the temporary file used for the commit message and TextMate stores per-file caret position (via extended attributes).
To avoid this problem you can set the Git editor to mate -wl1. This instructs TextMate to open with the caret at line 1 rather than where it last was.
To set it like this for Git, you can set the GIT_EDITOR variable or Git’s core.editor configuration variable.
When TeX gives an error message relating to a file, you can enter e to edit the file (and correct the error).
To setup TextMate to be used in this case, setup the TEXEDIT variable like this:
export TEXEDIT='mate -w -l %d "%s"'
lessThe less pager supports editing the file being viewed by pressing v. To setup TextMate to be used with less, you need to setup the LESSEDIT variable:
export LESSEDIT='mate -l %lm %f'
The txmt URL scheme allows you to open files in TextMate via hyperlinks found for example in HTML documents (anchors). These can refer to local files which can be useful when:
Using commands with HTML output that indicate errors/warnings with the current document, or refer to other documents in your project.
If you are generating a set of web-pages from simpler (text) files you can have these link to the original text files, so that when you are inspecting the generated result (in a browser) you can quickly edit the source of each page by following the txmt:-link.
The URL scheme is txmt: and currently has one command named open. This command takes up to three arguments:
url — the (file) URL to open (e.g. url=file://~/.bash_profile), if this is left out, the current document is targeted.line — the line on which the caret should be placed after opening the file (e.g. line=11).column — the column on which the caret should be placed after opening the file (e.g. column=3).So a full example of a txmt: URL could be (click here to test):
txmt://open/?url=file://~/.bash_profile&line=11&column=2
TextMate implements the server side of the ODB Editor Suite. This allows it to be used as external editor for programs which implement the client side of the protocol.
Many programs do however use a hardcoded list of which text editors implement the protocol, so if you cannot find TextMate in the list of external editors for an application which does support the ODB Editor Suite, you may need to write to the author of that application and request that TextMate gets added to its list of supported editors.
There is a wiki page which tracks the status of applications that can be configured to use an external text editor.
Included with TextMate is an “Edit in TextMate” input manager which you can install to get the ability to call upon TextMate from the standard Cocoa text editor control (including the one used in Mail). This is useful for programs which do not implement the ODB Editor Suite (e.g. Safari’s form elements).
For more info select the Install “Edit in TextMate”… action located in the TextMate bundle (using the gear menu in the status bar). This provides you with full documentation about the input manager before actually installing it.
TextMate has a few settings which are not exposed in the GUI.
You can change these with the defaults shell command but you need to do this while TextMate is not running.
You set a key to a given value with the following syntax:
defaults write com.macromates.textmate «key» «value»
You can always reset a key to its default value using:
defaults delete com.macromates.textmate «key»
Or you can read the value of a key using:
defaults read com.macromates.textmate «key»
NSDragAndDropTextDelayWhen you press mouse down on the selection and move the mouse, TextMate will start a new selection, unless you wait 150 milliseconds, then it will instead drag the selection. This delay can be changed by adjusting this preferences value.
Setting it to a value less than zero (e.g. -1) will disable the ability to drag a selection, meaning clicking the mouse inside a selection immediately deselects it and starts a new selection from that point (if the mouse is moved while the button is down).
Setting it to zero will immediately start a drag.
Example:
defaults write com.macromates.textmate NSDragAndDropTextDelay 0
NSRecentDocumentsLimitThis sets the number of documents kept in the “Open Recent” menu. The default value is 25.
Example:
defaults write com.macromates.textmate NSRecentDocumentsLimit 50
OakBundleItemsPopUpMenuKeyEquivalentThe key equivalent which should open the gear menu in the status bar. This is a key equivalent description as used in the system key bindings file. The default value is “^\033” (control escape).
For more information about key codes see this letter.
OakBundleManagerDisambiguateMenuFontSizeIf you find the font used in the menu to disambiguate tab triggers, key equivalents and similar, too small, then you can run:
defaults write com.macromates.textmate OakBundleManagerDisambiguateMenuFontSize 14
OakDefaultBundleForNewBundleItemsWhen you create a new item in the bundle editor without having selected a bundle first, then the bundle with the UUID held by this defaults key is used as the target.
This automatically gets set to the first bundle you create. For an example of how to change it see this letter.
OakDefaultLanguageSets the default language used for new (untitled) documents. The value should be the UUID of the language to be used.
For more information see this message from the mailing list.
OakDisableSessionRestoreWhen you launch TextMate it will open the project / document which was open when you last exited. You can however disable this feature by running:
defaults write com.macromates.textmate OakDisableSessionRestore 1
OakDocumentCustomFSMetaDataAn array of file systems for which TextMate should use its own functions for storing meta data (setxattr replacement). The meta data is stored in AppleDouble format. The default value is ( afpfs, nfs, msdos ) since setxattr can cause a kernel panic for these file systems (rdar://4162474).
Example:
defaults write com.macromates.textmate \
   OakDocumentCustomFSMetaData '( afpfs, nfs, msdos, hfs )'
OakDocumentDisableFSMetaDataSee extended attributes for more info.
OakFindPanelDisableHistoryThis disables the history controls in the find panel. The reason for this setting is only because some users have experienced crashes when using the tab key in the find dialog and this is caused by the history controls used. Currently the only workaround is to disable the use of these controls:
defaults write com.macromates.textmate OakFindPanelDisableHistory 1
OakToolTipMouseMoveIgnorePeriod and OakToolTipMouseDistanceThresholdWhen a command brings up a tool tip, mouse movements performed within the first second do not close the tool tip and after that second has elapsed, the mouse needs to be moved at least 5 pixels for the tool tip to close. These values can be adjusted using the OakToolTipMouseMoveIgnorePeriod and OakToolTipMouseDistanceThreshold defaults keys.
OakWrapColumnsThis is an array of the values which appear in the View → Wrap Column submenu. Defaults to showing 40 and 78 as possible wrap columns.
Example:
defaults write com.macromates.textmate OakWrapColumns '( 60, 70, 80, 120 )'
OakWordsExcludedFromCapitalizationThe Text → Convert → to Titlecase action (⌃⌥U) excludes words found in this array.
The default value is ( a, an, and, at, but, by, else, for, from, if, in, nor, of, off, on, or, out, over, the, then, to, up, when ).
There is a mailing list for TextMate. The archive is public and you can search it with this form:
There is a ##textmate IRC channel on freenode.net.
David Powers has created a succinct cheat sheet (direct link to PDF) which you can print and have next to your computer. It lists key equivalents for many useful general actions.
Soryu has written two TextMate tutorials dealing with setup and basic usage.
You can subscribe to the screencast RSS feed via iTunes.
Here is a list with direct links to a few of the screencasts in recommended viewing order:
For the full list with a brief summary see the online screencast page.
Normally TextMate presents settings and such using a GUI, but for the language grammars and preferences items it exposes you to the old-style property list format.
For the purposes of TextMate this format has 3 data types which are described below. Notice that the escape rules for strings have been changed slightly compared to Apple’s official format. This was done to make the language grammars more readable, since these need a lot of literal escape characters.
The basic type is a string which can be either single or double quoted.
When the string is single quoted, all characters are verbatim. If you need to put a ' inside a single quoted string, you need to use two, for example:
'Normal string'          => Normal string
'That''s an apostrophe'  => That's an apostrophe
'String with \backslash' => String with \backslash
As you can see, the only interpretation which happens is to convert any occurrence of '' to a single '.
Double quoted strings do support escape sequences, apart from \" and \\. For example:
"Normal string"          => Normal string
"Some \"quoted\" text"   => Some "quoted" text
"Literal \escape"        => Literal \escape
"Escaped \\escape"       => Escaped \escape
"Two \\\escapes"         => Two \\escapes
When a string consists entirely of letters, underscores and dashes, it is possible to omit the quotes. For example the following are all legal strings:
foreground-color
this_is_a_string
justLettersInThisOne
Arrays are collections of elements, each element can be another array, a string or a dictionary. Elements are comma separated and the entire list is enclosed in parentheses. Some examples:
( "foo", "bar", "fud" )
( "nested", ( "array", "in" ), "array" )
It is allowable to put a comma after the last element, like this:
( "foo", "bar", "fud", )
Dictionaries associate a value with a name (key). They are also known as maps, hashes, associative arrays and probably go under a few other terms as well.
The structure is: { «key» = «value»; } here «key» is a string and «value» can be either an array, string or another dictionary. Some examples:
{ color = "black"; }
{ colors = ( "red", "green", "blue" ); }
Source code and structured text generally have indentation conventions. TextMate can help you with these if you tell it when to increase and decrease the indent.
Having TextMate figure out the proper indentation is useful when you paste text in another part of the source (where the indentation is different), when you press return on a line that affects the indentation (for next line), or when you press tab at the beginning of the line (and want as much indentation as appropriate for that line).
Some languages go a little beyond a single character/keyword to increase and another to decrease, so TextMate has four (regexp) patterns you can set to tell it about your indentation conventions.
The patterns should be set in the Bundle Editor and are set as preference items with the scope set to the scope for which you want the rules to apply (e.g. source.c++).
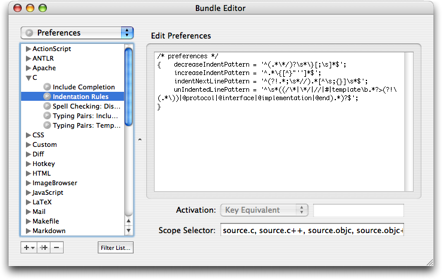
We will use the following code example to explain the four patterns:
 1  int main (int argc, char const* argv[])
 2  {
 3     while(true)
 4     {
 5        if(something())
 6           break;
 7  #if 0
 8        play_awful_music();
 9  #else
10        play_nice_music();
11  #endif
12     }
13     return 0;
14  }
The increaseIndentPattern should match the lines which increase the indent. In our example above, this is the { characters at lines 2 and 4 (the if on line 5 will be discussed later).
The simple preference for this pattern would be:
increaseIndentPattern = '\{';
However, since we could have code like this:
int arr[] = { 1, 2, 3 };
or
str = "foo {";
we need to make it a little more complicated, by ensuring that no }, " or ' will follow the { on the same line. A good choice for languages which use the bracket to start a block would be:
increaseIndentPattern = "^.*\{[^}\"']*$";
The decreaseIndentPattern should match the counterpart of our increase indent pattern. In our example the indent is increased by lines 12 and 14. The character here is } and so the simple decrease indent pattern would be setup as:
decreaseIndentPattern = '\}';
the more complex version may allow only comment end markers in front of the } and whitespace or ; after the }, so with that in mind, we extend the pattern to:
decreaseIndentPattern = '^(.*\*/)?\s*\}[;\s]*$';
We ignored line 5 in the increase indent pattern, that is because it does not really increase the indent, it only causes the next line to be indented if a block is not started.
For this situation there is the indentNextLinePattern, which should match these lines. We could make it something like:
indentNextLinePattern = 'if|while|for|switch|…';
But generally in C-like languages, all lines not terminated with a semi-colon (or ending with starting a block), cause the next line to be indented. This is (with most conventions) also the case when manually breaking one expression into several lines, e.g.:
some_function(argument1,
   argument2,
   argument3);

more_code;
So instead of explicitly matching known language constructs which have the next line indented, we simply match all lines which are not terminated with a semi-colon or brackets. One thing to remember is single-line comments like this:
some_function(arg); // this is terminated
To solve that, we start with a negative look-ahead assertion in this case and then go on to match lines not terminated by any of the characters mentioned above. The pattern ends up as:
indentNextLinePattern = '^(?!.*;\s*//).*[^\s;{}]\s*$';
Sometimes we have lines which are outside the normal indent, or does not affect the indent despite matching our rather general indentNextLinePattern. In our example these are the preprocessor lines (line 7, 9 and, 11).
To tell TextMate about these lines, there is an unIndentedLinePattern rule. Another case to avoid might be something like this:
 1     some_function();
 2
 3  /* ignore_first();
 4     ignore_second();
 5  */
 6     more_functions();
Here line 3 and 5 would count as having zero indent, so we want to ignore these.
To instruct it to ignore preprocessor lines, lines with leading comments or a few Objective-C directives (which are not terminated by a semi-colon), we can use this pattern:
unIndentedLinePattern =
   '^\s*((/\*|\*/\s*$|//|#|@interface|@implementation|@end).*)?$';
When launched, TextMate loads plug-ins located in ~/Library/Application Support/TextMate/PlugIns. The plug-in should be a normal Objective-C bundle with a principal class which will receive an initWithPlugInController: when instantiated.
There is a sample plug-in here. Though other than the startup message, TextMate does not offer any API for the plug-in to use (but will likely do so in the future).
If you are interested in developing plug-ins for TextMate, you can subscribe to the plug-ins mailing list.